Subscriptions
ActiveMember360 Payment module Subscriptions are a WordPress custom post type.
Adding and managing Subscriptions is done in exactly the same way as with any standard WordPress post/page.
Subscriptions can be listed, created, and managed from the WordPress administrator main navigation.
Adding Subscriptions
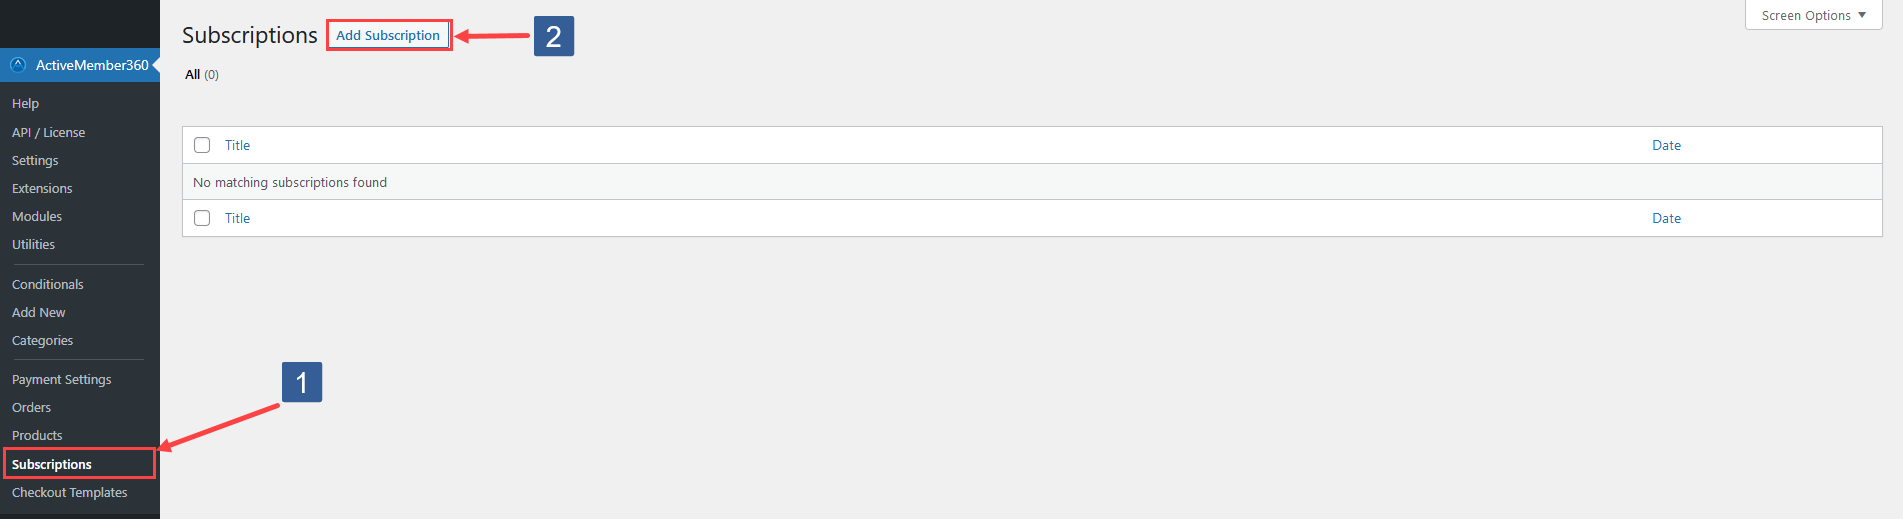
- In WordPress administrator main navigation click ActiveMember360, Subscriptions.
- Click Add Subscription.
-
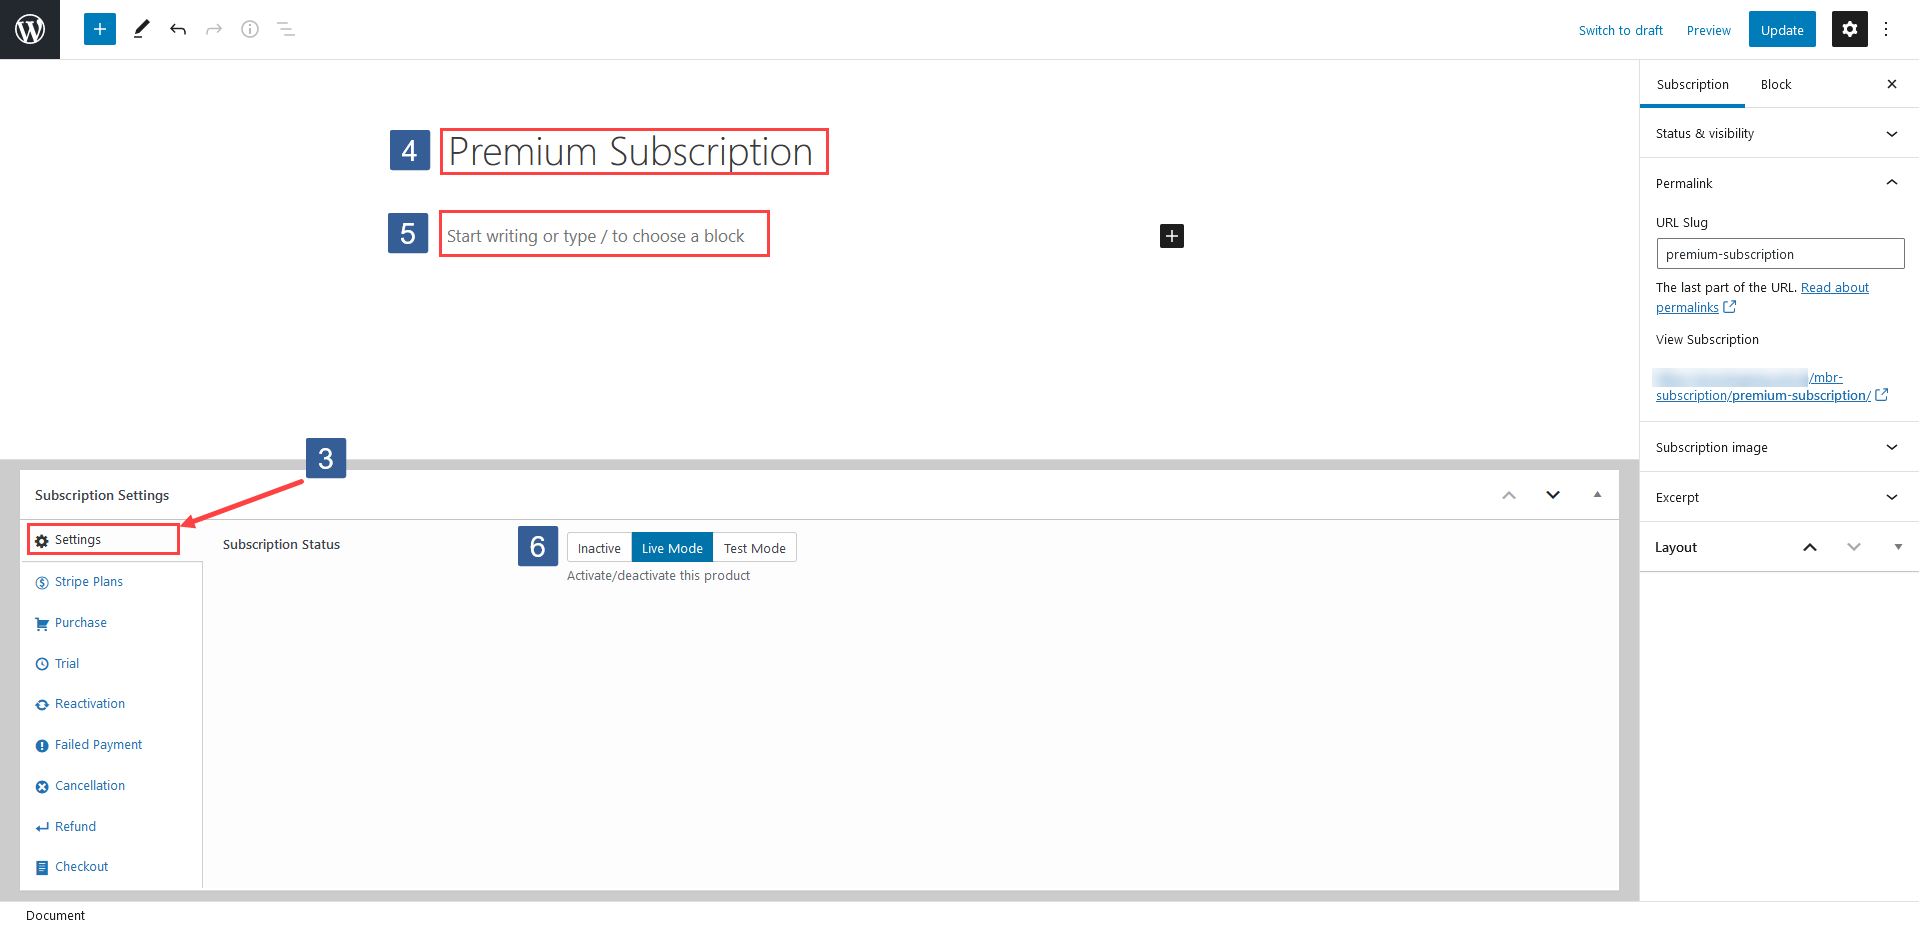
In ActiveMember360 Subscription Settings tabs click Settings.
-
Specify a title/name for your subscription.
This is the name your users will see for the subscription.
-
Specify your subscription description.
-
Set your Subscription Status as active by choosing Live or Test or deactivate by choosing Inactive.
Steps to specify Payment Module subscription Stripe plan
-
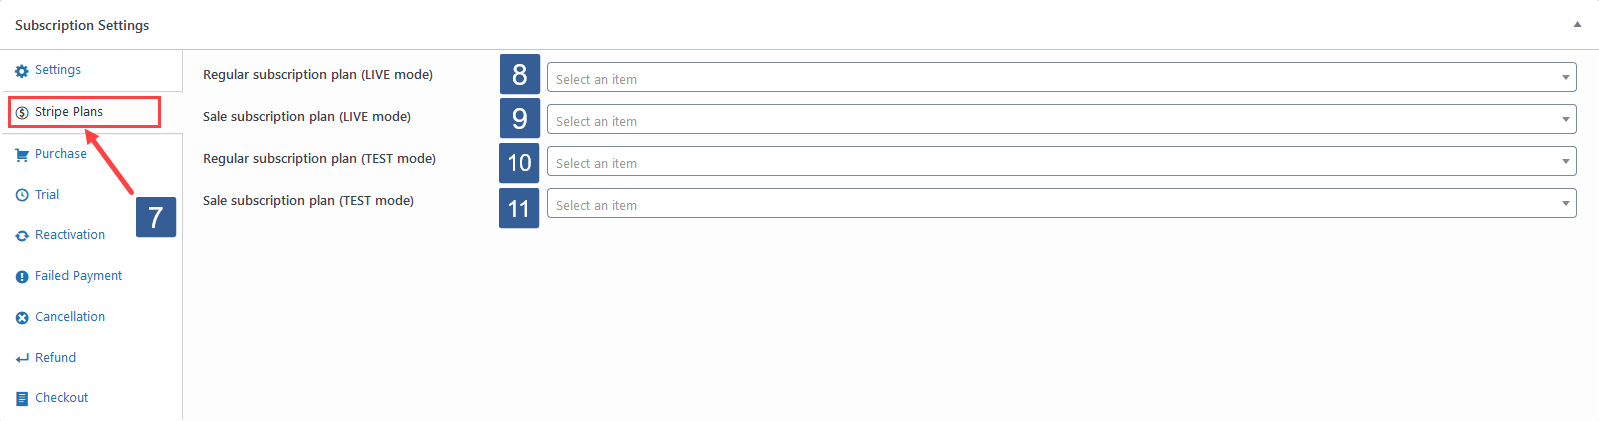
In ActiveMember360 Subscription Settings tabs click Stripe Plans.
ImportantSubscription plans must be defined in your Stripe account prior to progressing with the following steps.
-
Select from the dropdown the Regular Subscription Plan (Live Mode).
When the subscription has a Live status this Stripe plan and price will be displayed and charged as long as no Sale Subscription Plan (Live Mode) is selected.
-
Select from the dropdown the Sale Subscription Plan (Live Mode).
When the subscription has a Live status this Stripe plan and price will be displayed and charged as long as no Regular Subscription Plan (Live Mode) is selected.
-
Select from the dropdown the Regular Subscription Plan (Test Mode).
When the subscription has a Test status this Stripe plan and price will be displayed and charged as long as no Sale Subscription Plan (Test Mode) is defined.
-
Select from the dropdown the Sale Subscription Plan (Test Mode).
When the subscription has a Test status this Stripe plan and price will be displayed and charged as long as no Regular Subscription Plan (Test Mode) is defined.
Steps to specify Payment Module subscription purchase actions
-
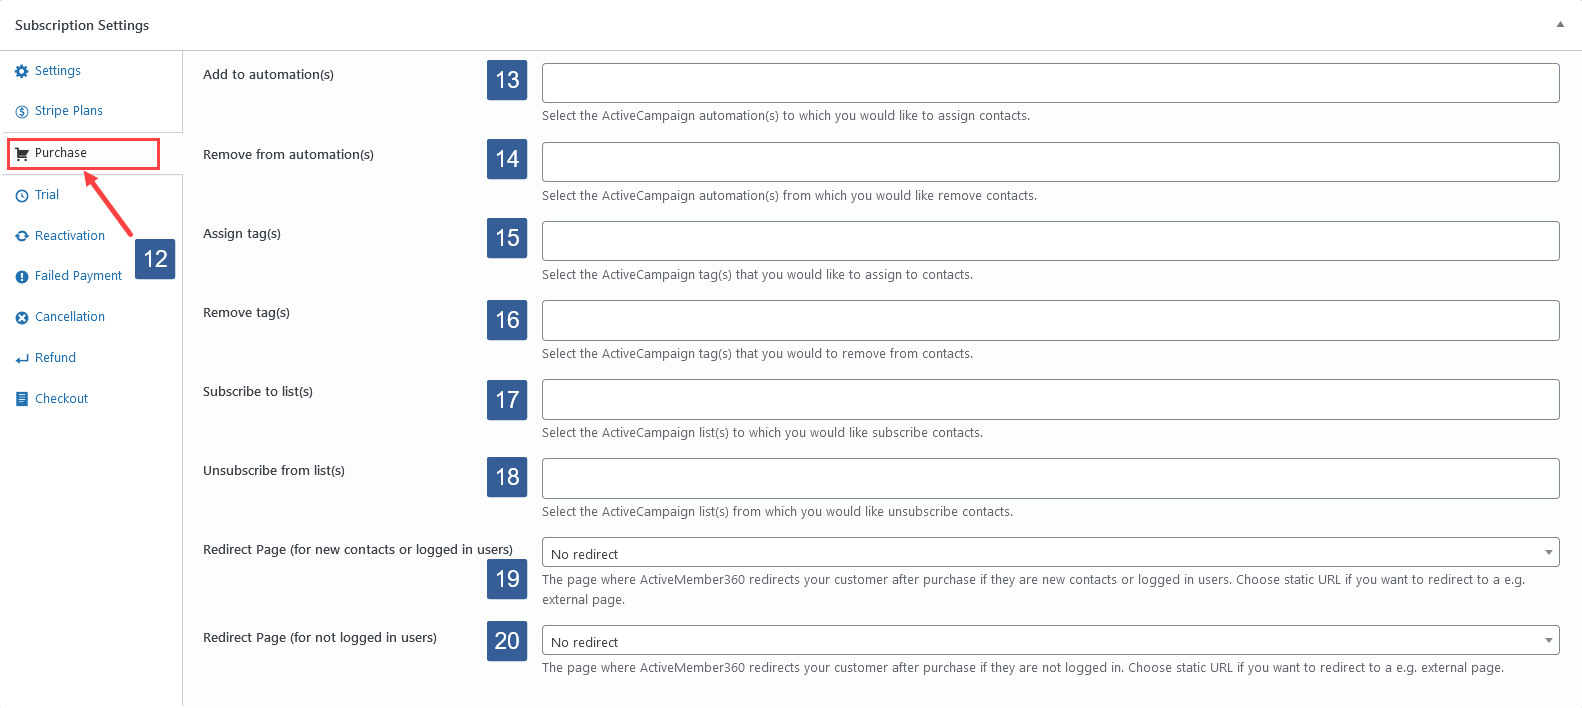
In ActiveMember360 Subscription Settings tabs click Purchase.
Within this tab the actions to be performed by ActiveMember360 after a successful subscription purchase can be specified.
ImportantIf your Stripe plan has Trial Days these actions triggers after the first successful payment after the trial period ends.
-
From the Add to automation(s) drop down select the ActiveCampaign automation(s) to add to the contact in ActiveCampaign after a successful subscription purchase.
Click the drop down then scroll or start typing any consecutive characters of the automation name to refine the list and aid selection.
Then click on the required automation.
Multiple automations can be selected as required.
Individual automations can be removed from the selection by clicking on the x shown next to the individual automation name.
All automations can be removed from the selection by clicking on the x shown in the far right of the drop down.
-
From the Remove from automation(s) drop down select the ActiveCampaign automation(s) to remove from the contact in ActiveCampaign after a successful subscription purchase.
-
From the Add Tag(s) drop down select the ActiveCampaign contact tags to be added to the contact in ActiveCampaign after a successful subscription purchase.
Click the drop down then scroll or start typing any consecutive characters of the contact tag name to refine the list and aid selection.
Then click on the required tag.
Multiple tags can be selected as required.
Individual tags can be removed from the selection by clicking on the x shown next to the individual tag name.
All tags can be removed from the selection by clicking on the x shown in the far right of the drop down.
-
From the Remove Tag(s) drop down select the ActiveCampaign contact tags to be removed from the contact in ActiveCampaign after a successful subscription purchase.
-
From the Subscribe to list(s) drop down select the ActiveCampaign lists the contact should be subscribed to in ActiveCampaign after a successful subscription purchase.
Click the drop down then scroll or start typing any consecutive characters of the list name to refine the list and aid selection.
Then click on the required list.
Multiple lists can be selected as required.
Individual lists can be removed from the selection by clicking on the x shown next to the individual list name.
All lists can be removed from the selection by clicking on the x shown in the far right of the drop down.
-
From the Unsubscribe from list(s) drop down select the ActiveCampaign lists the contact should be unsubscribed from in ActiveCampaign after a successful subscription purchase.
-
From the Redirect Page (for when both new contacts and users or logged in users) drop down select the redirect page/post to which the purchaser should be redirected to after a successful purchase if they are logged in at the time of purchasing or are created as a new contact and a new WordPress user by completing a successful purchase.
ImportantAfter a successful subscription purchase if the purchaser is not logged in they will be automatically logged in if they do not exist as a contact within ActiveCampaign or WordPress user prior to purchase.
This redirect will apply in such cases.
-
From the Redirect Page (for not logged in users) drop down select your redirect page to which the customer should be sent to after a successful subscription purchase if they are not logged in at the time of purchasing.
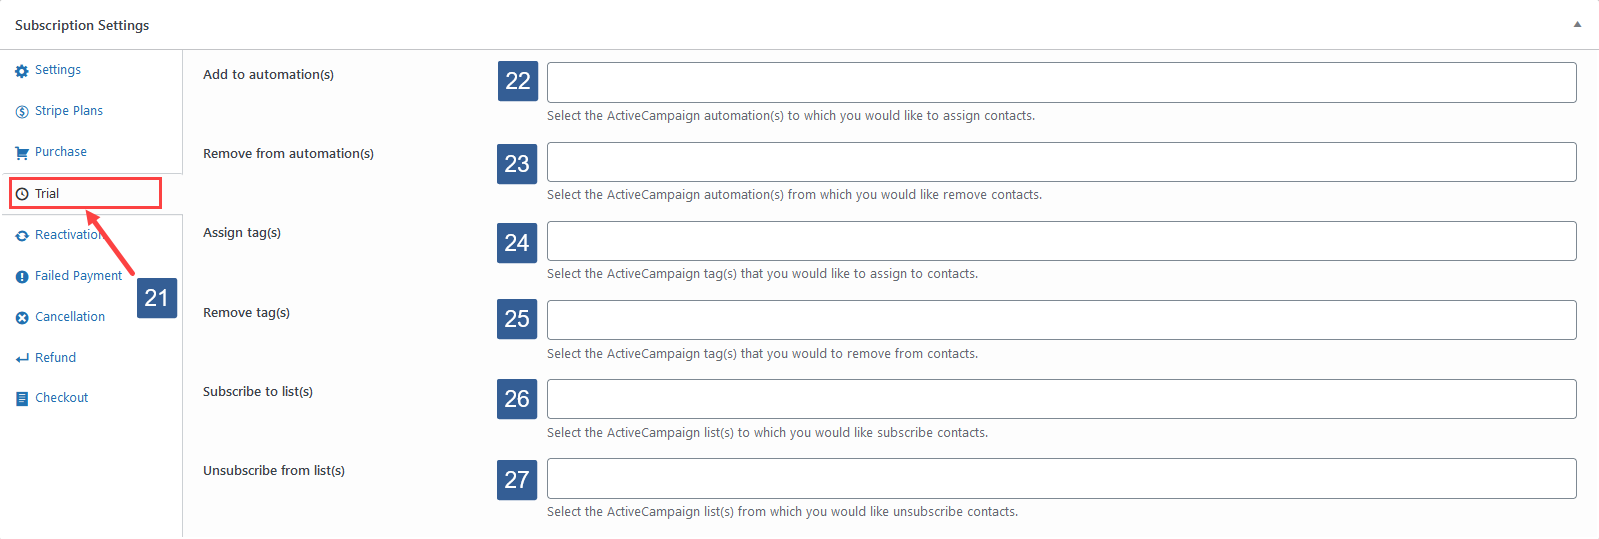
Steps to specify Payment Module subscription trail actions
-
In ActiveMember360 Subscription Settings tabs click Trial.
Within this tab the actions to be performed by ActiveMember360 after a successful subscription purchase for a subscription with trial days can be specified.
-
From the Add to automation(s) drop down select the ActiveCampaign automation(s) to add to the contact in ActiveCampaign after a successful subscription purchase for a subscription with trial days.
-
From the Remove from automation(s) drop down select the ActiveCampaign automation(s) to remove from the contact in ActiveCampaign after a successful subscription purchase for a subscription with trial days.
-
From the Add Tag(s) drop down select the ActiveCampaign contact tags to be added to the contact in ActiveCampaign after a successful subscription purchase for a subscription with trial days.
-
From the Remove Tag(s) drop down select the ActiveCampaign contact tags to be removed from the contact in ActiveCampaign after a successful subscription purchase for a subscription with trial days.
-
From the Subscribe to list(s) drop down select the ActiveCampaign lists the contact should be subscribed to in ActiveCampaign after a successful subscription purchase for a subscription with trial days.
-
From the Unsubscribe from list(s) drop down select the ActiveCampaign lists the contact should be unsubscribed from in ActiveCampaign after a successful subscription purchase for a subscription with trial days.
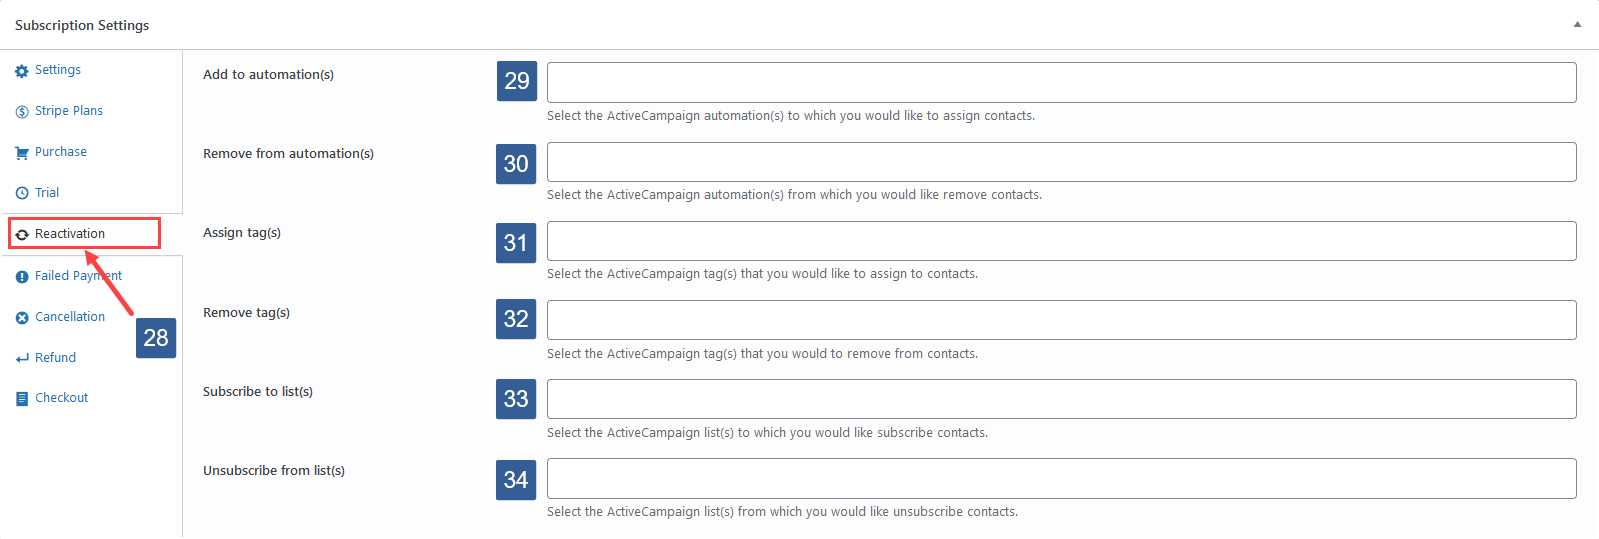
Steps to specify Payment Module subscription reactivation actions
-
In ActiveMember360 Subscription Settings tabs click Reactivation.
Within this tab the actions to be performed by ActiveMember360 after a successful subscription reactivation can be specified.
ImportantThis reactivation actions are only performed after the the subscription is reactivated after being paused due to a failed recurring payment. As soon as the recurring payment is successful the reactivation actions are performed.
-
From the Add to automation(s) drop down select the ActiveCampaign automation(s) to add to the contact in ActiveCampaign upon reactivation of a subscription.
-
From the Remove from automation(s) drop down select the ActiveCampaign automation(s) to remove from the contact in ActiveCampaign upon reactivation of a subscription.
-
From the Add Tag(s) drop down select the ActiveCampaign contact tags to be added to the contact in ActiveCampaign upon reactivation of a subscription.
-
From the Remove Tag(s) drop down select the ActiveCampaign contact tags to be removed from the contact in ActiveCampaign upon reactivation of a subscription.
-
From the Subscribe to list(s) drop down select the ActiveCampaign lists the contact should be subscribed to in ActiveCampaign upon reactivation of a subscription.
-
From the Unsubscribe from list(s) drop down select the ActiveCampaign lists the contact should be unsubscribed from in ActiveCampaign upon reactivation of a subscription.
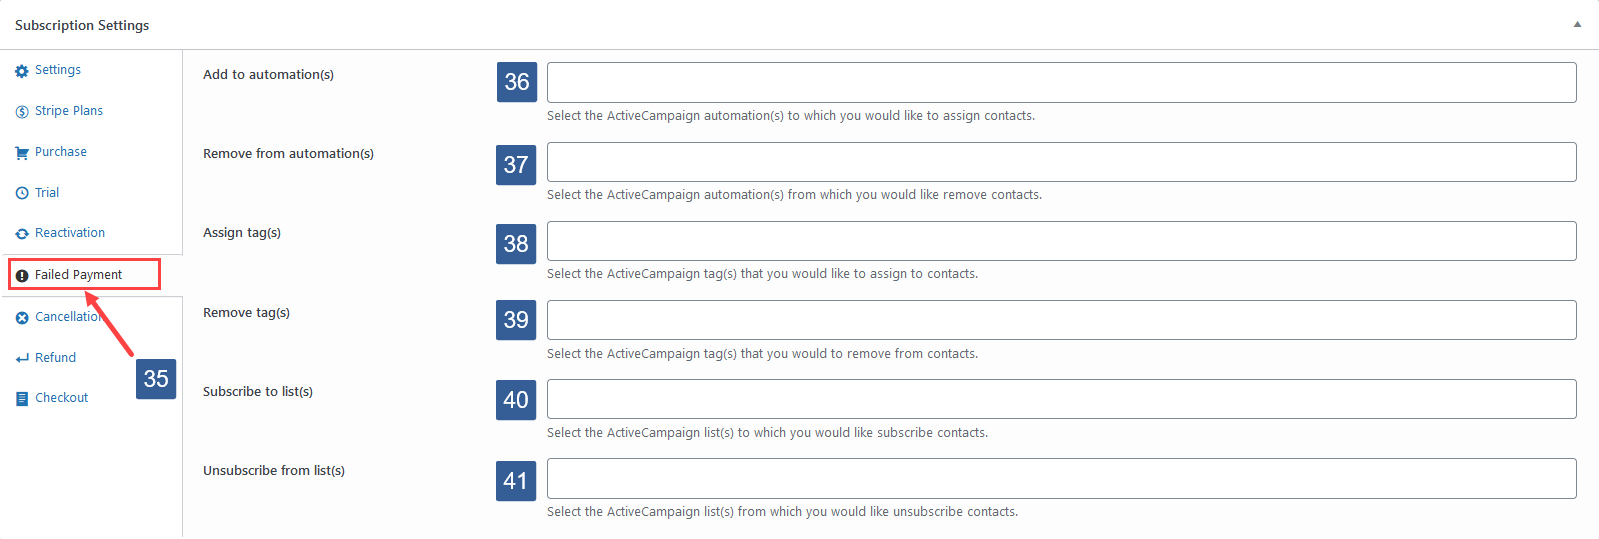
Steps to specify Payment Module subscription failed payment actions
-
In ActiveMember360 Subscription Settings tabs click Failed Payment.
Within this tab the actions to be performed by ActiveMember360 after a failed recurring subscription payment can be specified.
-
From the Add to automation(s) drop down select the ActiveCampaign automation(s) to add to the contact in ActiveCampaign after a failed recurring subscription payment.
-
From the Remove from automation(s) drop down select the ActiveCampaign automation(s) to remove from the contact in ActiveCampaign after a failed recurring subscription payment.
-
From the Add Tag(s) drop down select the ActiveCampaign contact tags to be added to the contact in ActiveCampaign after a failed recurring subscription payment.
-
From the Remove Tag(s) drop down select the ActiveCampaign contact tags to be removed from the contact in ActiveCampaign after a failed recurring subscription payment.
-
From the Subscribe to list(s) drop down select the ActiveCampaign lists the contact should be subscribed to in ActiveCampaign after a failed recurring subscription payment.
-
From the Unsubscribe from list(s) drop down select the ActiveCampaign lists the contact should be unsubscribed from in ActiveCampaign after a failed recurring subscription payment.
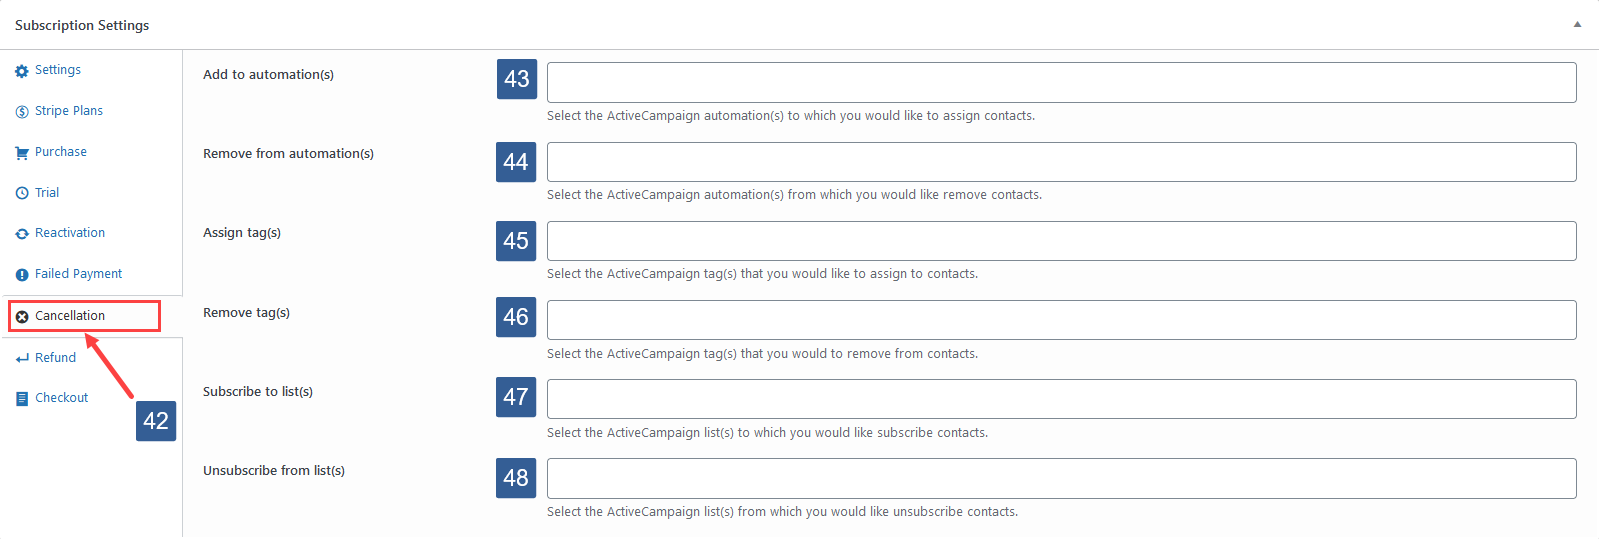
Steps to specify Payment Module subscription cancellation actions
-
In ActiveMember360 Subscription Settings tabs click Cancellation.
Within this tab the actions to be performed by ActiveMember360 after a subscription cancellation can be specified.
ImportantThis cancellation actions are performed when the subcription which is marked for cancellation reaches the end of the current paid up period.
They are not performed at the time the subscription is marked for cancellation.
-
From the Add to automation(s) drop down select the ActiveCampaign automation(s) to add to the contact in ActiveCampaign after a subscription cancellation.
-
From the Remove from automation(s) drop down select the ActiveCampaign automation(s) to remove from the contact in ActiveCampaign after a subscription cancellation.
-
From the Add Tag(s) drop down select the ActiveCampaign contact tags to be added to the contact in ActiveCampaign after a subscription cancellation.
-
From the Remove Tag(s) drop down select the ActiveCampaign contact tags to be removed from the contact in ActiveCampaign after a subscription cancellation.
-
From the Subscribe to list(s) drop down select the ActiveCampaign lists the contact should be subscribed to in ActiveCampaign after a subscription cancellation.
-
From the Unsubscribe from list(s) drop down select the ActiveCampaign lists the contact should be unsubscribed from in ActiveCampaign after a subscription cancellation.
Steps to specify Payment Module subscription refund actions
-
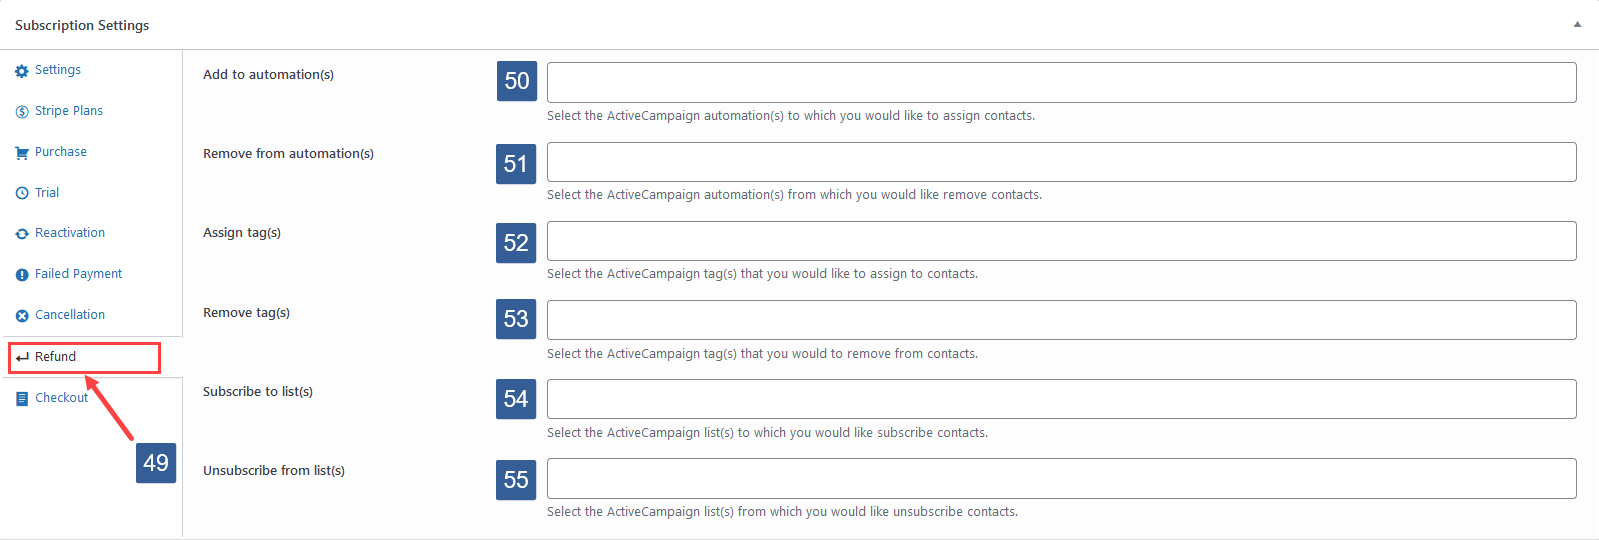
In ActiveMember360 Subscription Settings tabs click Refund.
Within this tab the actions to be performed by ActiveMember360 after a successful full refund can be specified.
-
From the Add to automation(s) drop down select the ActiveCampaign automation(s) to add to the contact in ActiveCampaign after a successful full refund.
Click the drop down then scroll or start typing any consecutive characters of the automation name to refine the list and aid selection.
Then click on the required automation.
Multiple automations can be selected as required.
Individual automations can be removed from the selection by clicking on the x shown next to the individual automation name.
All automations can be removed from the selection by clicking on the x shown in the far right of the drop down.
-
From the Remove from automation(s) drop down select the ActiveCampaign automation(s) to remove from the contact in ActiveCampaign after a successful full refund.
-
From the Add Tag(s) drop down select the ActiveCampaign contact tags to be added to the contact in ActiveCampaign after a successful full refund.
Click the drop down then scroll or start typing any consecutive characters of the contact tag name to refine the list and aid selection.
Then click on the required tag.
Multiple tags can be selected as required.
Individual tags can be removed from the selection by clicking on the x shown next to the individual tag name.
All tags can be removed from the selection by clicking on the x shown in the far right of the drop down.
-
From the Remove Tag(s) drop down select the ActiveCampaign contact tags to be removed from the contact in ActiveCampaign after a successful full refund.
-
From the Subscribe to list(s) drop down select the ActiveCampaign lists the contact should be subscribed to in ActiveCampaign after a successful full refund.
Click the drop down then scroll or start typing any consecutive characters of the list name to refine the list and aid selection.
Then click on the required list.
Multiple lists can be selected as required.
Individual lists can be removed from the selection by clicking on the x shown next to the individual list name.
All lists can be removed from the selection by clicking on the x shown in the far right of the drop down.
-
From the Unsubscribe from list(s) drop down select the ActiveCampaign lists the contact should be unsubscribed from in ActiveCampaign after a successful full refund.
ImportantThese refund actions are only performed when the payment related to this subscription is fully refunded. Fully refunded means either a full refund was made or multiple partial refunds were made against the payment that cover the full amount.
Refund actions are not performed if you made a single partial refund against the subscription’s payment which does not cover the full amount.
Refunds are made through your Stripe account interface.

Steps to specify Payment Module subscription checkout template
-
In ActiveMember360 Subscription Settings tabs click Checkout.
-
From the Checkout Template drop down select the checkout template to associate with the subscription.
ImportantTo be able to select a template at least one must have been previously defined as detailed at ActiveMember360, Payments, Checkout Template.
-
Click Publish/Update.
-
The subscription is now configured and can be purchased by redirecting a user to the URL highlighted.
Editing & Deleting Subscriptions
-
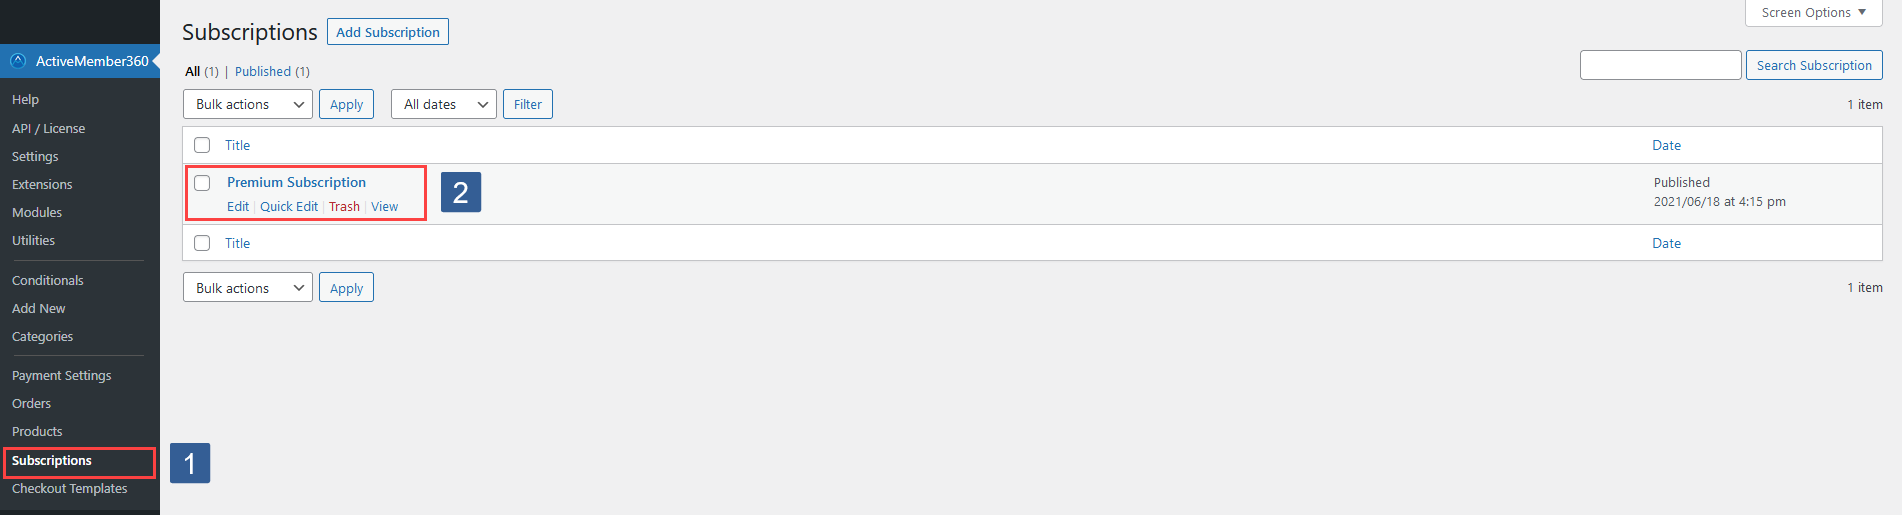
In WordPress administrator main navigation click Payment, Subscriptions.
-
When you hover over a subscription in the listing you will see the links to edit and trash (delete) the subscription.
ImportantIf you delete a subscription any link to the deleted subscription URL will trigger a 404 error.
Please ensure such links are removed or redirected.