Utilities
Overview
ActiveMember360 provides a set of utilities to allow you to effectively manage your ActiveMember360 installation.
These are accessible from the WordPress administrator main navigation ActiveMember360, Utilities.
These utilities include:
- API/Webhook - API/Webhook Log - Show API/Webhook log
- API/Webhook - Automatic Webhooks - List ActiveMember360 automatic webhooks within ActiveCampaign
- ActiveMember360 - Membership Tags - List ActiveCampaign tags that define ActiveMember360 memberships
- ActiveMember360 - Page/Post Settings - List ActiveMember360 settings for all pages/posts and custom post types controlled by ActiveMember360
- ActiveCampaign - Show Contact - List ActiveCampaign contact data
- ActiveCampaign - Tags - List ActiveCampaign tags
- ActiveCampaign - Contact Fields - List ActiveCampaign contact fields
- ActiveCampaign - Automations - List ActiveCampaign automations
- ActiveCampaign - Lists - List ActiveCampaign lists
- ActiveCampaign - Forms - List ActiveCampaign forms
- ActiveCampaign - Mail Templates - List ActiveCampaign mail templates
- ActiveCampaign - Cache Refresh - Trigger a cache refresh of ActiveCampaign data within WordPress
- System - Environment - List ActiveMember360 and system environment
- System - Database - List WordPress database information
- System - PHP Info - List PHP information
API/Webhooks
API/Webhook Log
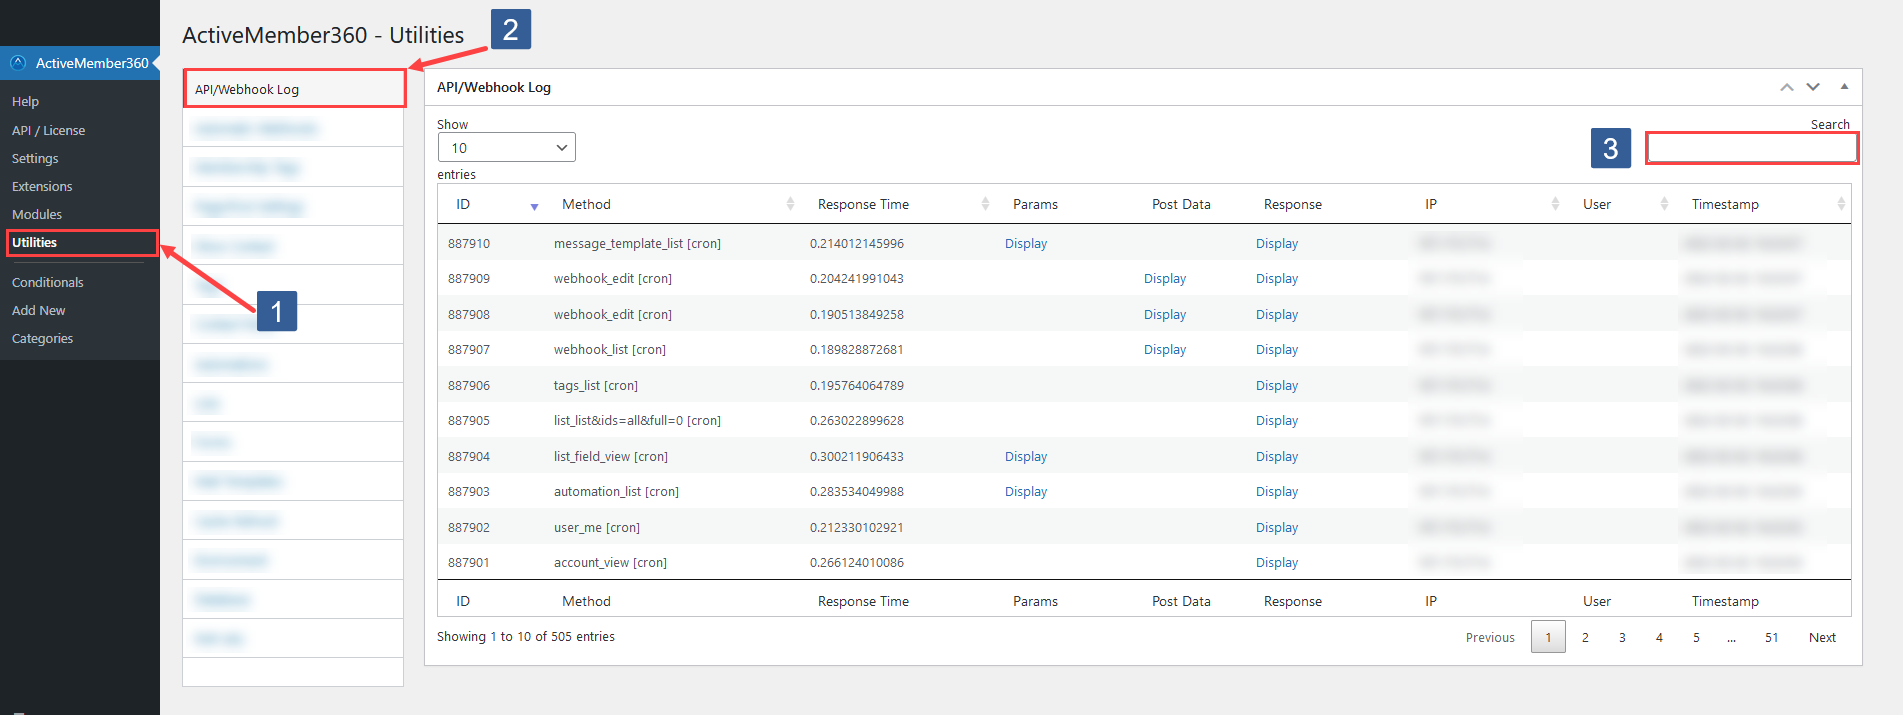
The API/Webhook log of ActiveMember360 ActiveCampaign API calls and HTTP POSTs received from webhooks is shown by selecting this tab.
The data provided in the API/Webhook log can be used to troubleshoot issues with, or confirm the correct operation of, the API/Webhooks and associated processes.
-
In WordPress administrator main navigation click ActiveMember360, Utilities.
-
In ActiveMember360 Utilities tabs click API/Webhook Log.
For each API call the following information is available in the log:
- ID – The ID of the API/Webhook log entry.
- Method – The API call method or Webhook type.
- Response Time – The time taken from when the API call was sent and the response received from ActiveCampaign.
- Params – The parameters sent with the API call.
- Post Data – The POST data sent with the API call.
- Response – The data received from ActiveCampaign in response to the API call. Includes the result code and result message from ActiveCampaign.
- IP - IP address from where the API call was made.
- User – The WordPress user who made the API call. Blank means a API call instigated by ActiveMember360.
- Timestamp – The time the API call was sent. This is shown in your local server time.
-
Enter any string and click Search to filter the API/Webhook log.
The API/Webook log is controlled by the settings within ActiveMember360, Settings, Logging.
The log will show as No API logs on file if within those settings both Enable API log and Enable Webhook log are set to No or if both API log max. number of "latest" calls and Webhook max. number of "latest" calls are set to zero.
The log will only ever show the latest entries totalling the sum of API log max. number of "latest" calls and Webhook max. number of "latest" calls. This limits the size of the log that is stored within a custom WordPress table named mbrApiLog.
Automatic Webhooks
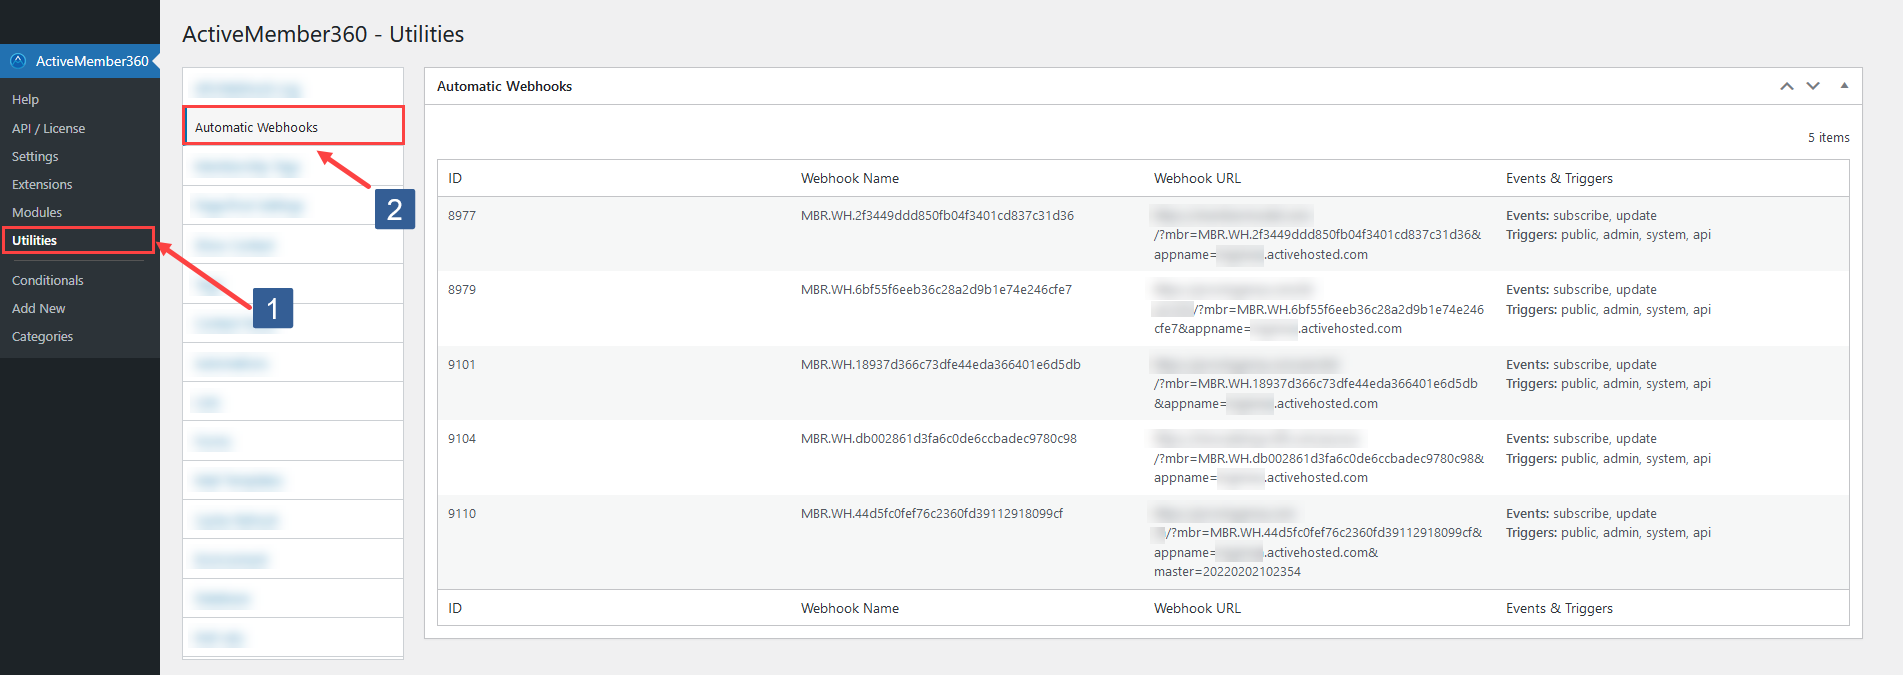
The automatic webhooks currently defined within ActiveCampaign, Settings, Developer, Manage Webhooks for communication with ActiveMember360 are listed by selecting this tab.
-
In WordPress administrator main navigation click ActiveMember360, Utilities.
-
In ActiveMember360 Utilities tabs click Automatic Webhooks.
The information shown includes:
- ID – ID of the webhook within ActiveCampaign.
- Webhook Name – Name of the webhook within ActiveCampaign.
- Webhook URL - The URL used with the webhook for the HTTP POST.
- Events & Triggers - The triggers that cause the webhook to run and the events where the triggers are active.
ImportantThis table only includes webhooks that have a name beginning MBR.WH and that are defined in ActiveCampaign, Settings, Developer, Manage Webhooks.
These webhooks are defined automatically by ActiveMember360 on every website connecting to the ActiveCampaign application where ActiveMember360, Modules, Automatic Webhooks is enabled.
ActiveMember360
Membership Tags
All the ActiveCampaign tags used within ActiveMember360, Settings, Memberships to define a membership level are listed by selecting this tab.
-
In WordPress administrator main navigation click ActiveMember360, Utilities.
-
In ActiveMember360 Utilities tabs click Membership Tags.
The information shown includes:
- Tag ID – Tag ID within ActiveCampaign of the tag assigned to the membership level
- Tag Name – Tag name within ActiveCampaign of the tag assigned to the membership level
- Membership Name - ActiveMember360 Membership Name
Page/Post Settings
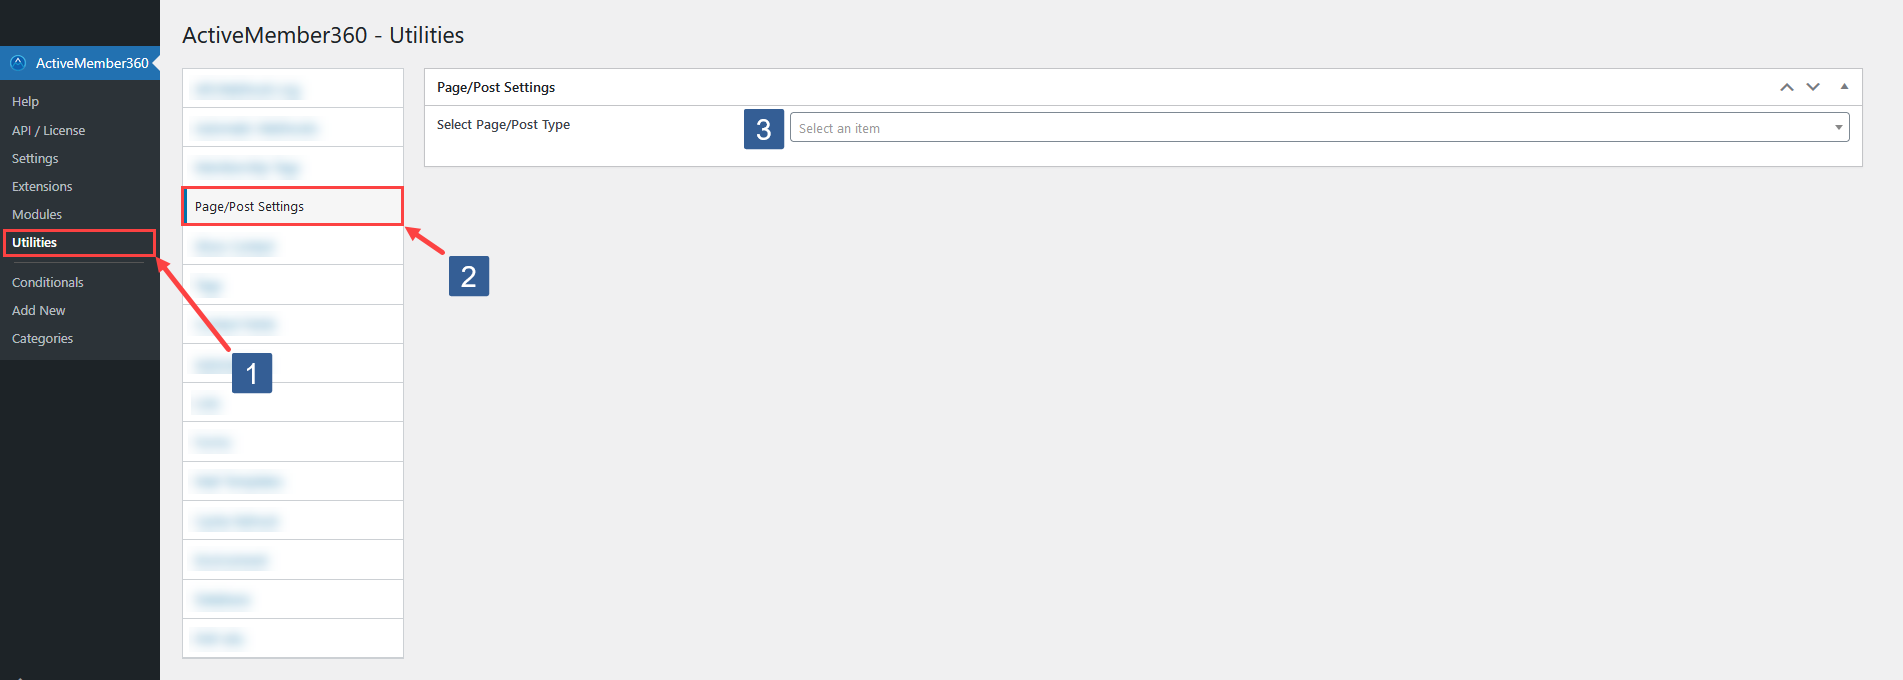
All the ActiveMember360 settings for each page/post and custom post type controlled by ActiveMember360 are listed by selecting this tab.
-
In WordPress administrator main navigation click ActiveMember360, Utilities.
-
In ActiveMember360 Utilities tabs click ActiveMember360 Page/Post Settings.
-
Click in the Select Page/Post Type selection area and select the required page/post type or start typing part of the post type name to refine the list.
Then click on the required page/post type for which you wish to show the ActiveMember360 post/page settings.
Individual custom post types can be removed from the selection by clicking on the x shown next to the individual custom post type name.
The information shown for each page/post of the selected page/post type includes:
- ID - The WordPress post ID
- Title - Page/Post Title
- Allow access for -
- Only/Not these Tags - Selected only/not these ActiveCampaign tags
- Conditional - Selected conditional and evaluation criteria
- Filters - Selected filters dependent upon page/post type
- Forbidden redirect - Redirect for those who are forbidden access
- Automation on comment - ActiveCampaign automation a logged in contact added to upon submitting a comment
- Status - Page/Post status
ActiveCampaign
Show Contact
By selecting this tab you can retrieve any contact record from ActiveCampaign by submitting an email address or ActiveCampaign contact ID.
The contact record is the most current live data, it is not cached data.
This provides an easy way to see a contacts live ActiveCampaign data without having to login your ActiveCampaign account. Ideal for checking what tags a contact has or their contact field values.
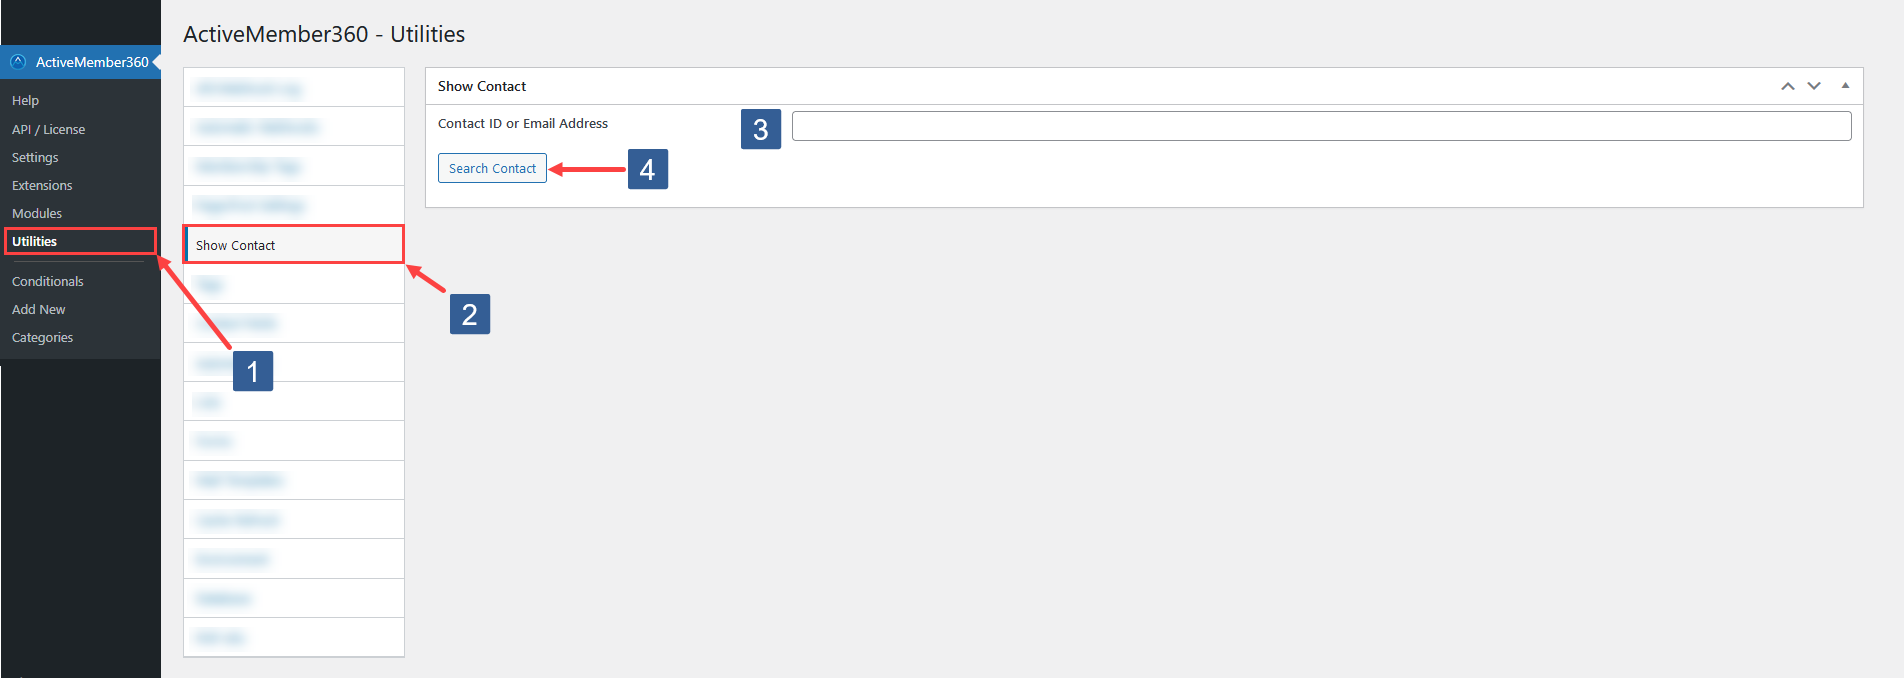
- In WordPress administrator main navigation click ActiveMember360, Utilities.
- In ActiveMember360 Utilities tabs click Show Contact.
- In Contact ID or Email Address enter the ActiveCampaign contact ID or contact email address.
- Click Search Contact.
Similar functionality is available directly from within the WordPress, Users, All Users listing as detailed within Show Contact Data Associated With A WordPress User. However when using that method data will only be shown for those users with an email address which matches that of a contact within ActiveCampaign.
Tags
All the contact tags defined in ActiveCampaign are listed by selecting this tab.
-
In WordPress administrator main navigation click ActiveMember360, Utilities.
-
In ActiveMember360 Utilities tabs click Tags.
The tag information shown includes:
- Tag ID – Tag ID within ActiveCampaign
- Tag Name – Tag name within ActiveCampaign
- Membership Name - ActiveMember360 Membership Name. This is always blank unless the tag is used within ActiveMember360, Settings, Memberships to define a membership level.
The table is sorted alphabetically by Tag Name.
The table can be searched using your standard browser search capability typically from the keyboard Ctrl+F (Cmd+F).
Please note this is cached data. This can be refreshed with the current ActiveCampaign tag definitions by using ActiveMember360, Utilities, Cache Refresh.
Tag ID’s vs. tag names: The use of tag ID’s over tag names is encouraged. Unless a tag is deleted, its tag ID can be considered persistent. Tag names, on the other hand, can be changed at any time. Using a tag name that has been changed can cause your shortcode, hook or module to no longer work as expected.
Contact Fields
All the contact fields defined in your ActiveCampaign are listed by selecting this tab. These are the contact fields defined by a user within ActiveCampaign, Lists, Manage Fields.
-
In WordPress administrator main navigation click ActiveMember360, Utilities.
-
In ActiveMember360 Utilities tabs click Contact Fields.
The fields information shown includes:
- Title – Name of the contact field within ActiveCampaign.
- ID – ID of the contact field within ActiveCampaign.
- Perstag – Personalization tag of the contact field.
- Data Type – Data type of the contact field.
- Default Value – Dependent upon the Type the available field options available.
The table is sorted alphabetically by Title.
The table can be searched using your standard browser search capability typically from the keyboard Ctrl+F (Cmd+F).
Please note this is cached data. This can be refreshed with the current ActiveCampaign contact field definitions by using ActiveMember360, Utilities, Cache Refresh.
It is the Perstag/Personalization tag of the contact field that should be used when specifying a contact field within ActiveMember360 shortcodes, modules and extensions. It can be used in upper or lower case format.
Automations
All the automations defined in ActiveCampaign are listed by selecting this tab.
-
In WordPress administrator main navigation click ActiveMember360, Utilities.
-
In ActiveMember360 Utilities tabs click Automations.
The fields information shown includes:
- ID – ID of the automation within ActiveCampaign.
- Automation Name – Name of the automation within ActiveCampaign.
The table is sorted numerically by ascending ID.
The table can be searched using your standard browser search capability typically from the keyboard Ctrl+F (Cmd+F).
Please note this is cached data. This can be refreshed with the current ActiveCampaign automation definitions by using ActiveMember360, Utilities, Cache Refresh.
Lists
All the lists defined in ActiveCampaign are listed by selecting this tab.
-
In WordPress administrator main navigation click ActiveMember360, Utilities.
-
In ActiveMember360 Utilities tabs click Lists.
The fields information shown includes:
- ID – ID of the list within ActiveCampaign.
- List Name – Name of the list within ActiveCampaign.
The table is sorted numerically by ascending ID.
The table can be searched using your standard browser search capability typically from the keyboard Ctrl+F (Cmd+F).
Please note this is cached data. This can be refreshed with the current ActiveCampaign list definitions by using ActiveMember360, Utilities, Cache Refresh.
Forms
All the forms defined in ActiveCampaign are listed by selecting this tab.
-
In WordPress administrator main navigation click ActiveMember360, Utilities.
-
In ActiveMember360 Utilities tabs click Forms.
- ID – ID of the form within ActiveCampaign.
- Form Name – Name of the form within ActiveCampaign.
The table is sorted numerically by ascending ID.
The table can be searched using your standard browser search capability typically from the keyboard Ctrl+F (Cmd+F).
Please note this is cached data. This can be refreshed with the current ActiveCampaign forms definitions by using ActiveMember360, Utilities, Cache Refresh.
Mail Templates
All the mail templates defined in ActiveCampaign are listed by selecting this tab.
-
In WordPress administrator main navigation click ActiveMember360, Utilities.
-
In ActiveMember360 Utilities tabs click Mail Templates.
- ID – ID of the email template within ActiveCampaign.
- Template Name – Name of the email template within ActiveCampaign.
The table is sorted numerically by ascending ID.
The table can be searched using your standard browser search capability typically from the keyboard Ctrl+F (Cmd+F).
Please note this is cached data. This can be refreshed with the current ActiveCampaign mail template definitions by using ActiveMember360, Utilities, Cache Refresh.
Cache Refresh
By selecting this tab you can chose to refresh cached ActiveCampaign data within WordPress.
This cache relates solely to ActiveCampaign system data. As an example all the contact tags or contact fields defined within ActiveCampaign.
It is not specific to data for a particular contact purely system data.
You would use this capability if you are adding new tags or contact fields etc. to your ActiveCampaign system.
In any event, irrespective of using Cache Refresh, ActiveMember360 updates the cache automatically whenever it is deemed necessary and also on the cache data refresh frequency as defined within ActiveMember360, Settings, Cache.
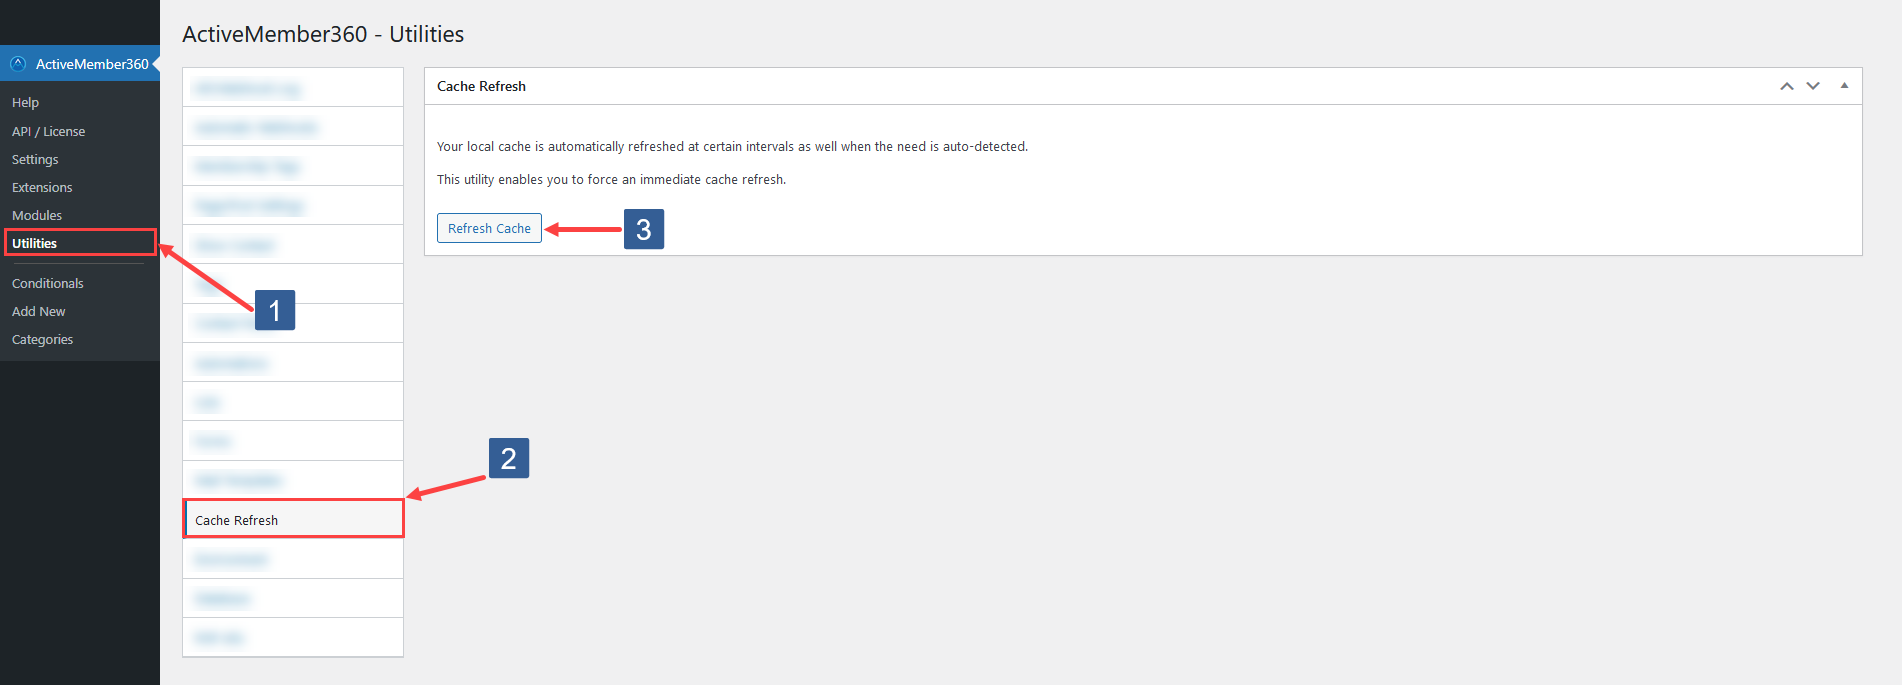
- In WordPress administrator main navigation click ActiveMember360, Utilities.
- In ActiveMember360 Utilities tabs click Cache Refresh.
- Click Refresh Now.
System
Environment
By selecting this tab you will see various data relating to your server, WordPress and ActiveMember360 environment.
This includes:
- License - ActiveMember360 license status and type.
- Versions – PHP, WordPress and MembersPlus versions.
- Site – Site name, site description, site URL, WP URL, Admin URL, Plugins URL, Admin email.
- Server – Plugin location, WP memory limit, WP admin memory limit , Memory used, Server IP, Host Name
- ActiveMember360 Constants – All ActiveMember360 constants.
- Active Plugins – Active WordPress plugins on the site.
- Inactive Plugins – Inactive WordPress plugins on the site.
- .htaccess – Listing of .htaccess.
- wp-config.php – Listing of wp-config.php.
Database
By selecting this tab you will see information relating to your WordPress database for this install.
PHP Info
By selecting this tab you can see information relating to your installation of PHP on your server.
It provides the equivalent information to that available when using phpinfo() in a PHP script.