Automatic Webhooks Module
Overview
Webhooks are a mechanism by which ActiveCampaign can automatically send updated contact data to your WordPress site running ActiveMember360.
The use of webhooks ensures the current contact data is always available to ActiveMember360, so logged in users can have access to the correct content etc.
Within ActiveCampaign there are two types of webhooks; those defined in automations, and those defined/listed in your ActiveCampaign application ActiveCampaign, Settings, Developer, Manage Webhooks.
Those defined/listed in your ActiveCampaign application ActiveCampaign, Settings, Developer, Manage Webhooks are those referred to as Automatic Webhooks or REST Hooks in this documentation.
Automatic Webhooks/REST Hooks are essentially webhooks with predefined triggers and/or conditions to automatically process the webhook (sometimes referred to as webhooks with subscriptions). This makes Automatic Webhooks/REST Hooks easier to configure for a user than webhooks. Automatic Webhooks/REST Hooks in most cases can be configured directly by an application without any user involvement.
For a fuller understanding of webhooks please refer to ActiveCampaign Webhooks.
Activation
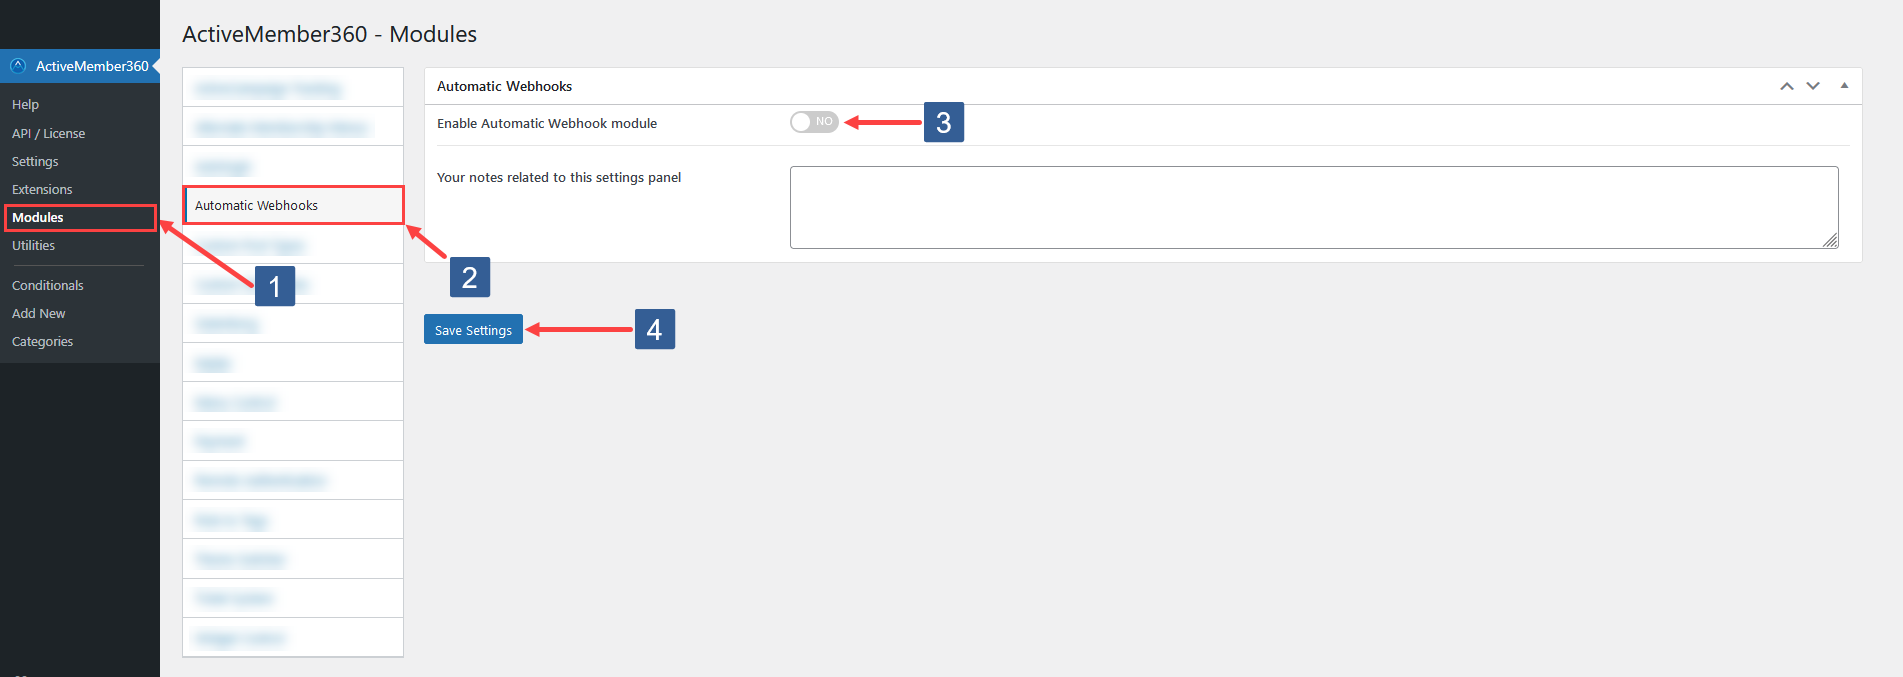
- In WordPress administrator main navigation click ActiveMember360, Modules.
- In ActiveMember360 Modules tabs click Automatic Webhook.
- Set Enable Automatic Webhook module to Yes/On.
- Click Save Settings.
Enabling the ActiveMember Automatic Webhooks module automatically configures a webhook within ActiveCampaign, Settings, Developer, Manage Webhooks for use with your ActiveMember360 powered WordPress site.
No further manual configuration is required.
Configuration
Enabling the ActiveMember Automatic Webhooks module automatically configures a webhook within ActiveCampaign, Settings, Developer, Manage Webhooks.
No changes should be made manually to the webhook created.
ActiveMember360 regularly checks for the presence of the webhook if ActiveMember360, Modules, Automatic Webhooks is enabled. If the webhook is deleted or any of the settings changed it will be reinstated with the required settings.

-
The Webhook Type should not be changed and should always be set to Default.
DEPRECATEDThe Webhook Type is now deprecated.
This setting remains solely to provide legacy support.
Automatic Webhook Actions
Once Automatic Webhooks have been enabled within ActiveCampaign, Settings, Developer, Manage Webhooks they will be listed as one of two types:

- The master webhook identified by the parameter master in the URL string serves two purposes. It sends the full contact record to ActiveMember360 but also instructs ActiveMember360 to automatically generate and store a password for the contact within ActiveCampaign if one does not exist.

- The standard webhook identified by no parameter master in the URL string sends the full contact record to ActiveMember360.
Both types of webhook are set to send an HTTP POST to the WordPress site when in ActiveCampaign the contact record is added or update i.e. the triggers Contact Added and Contact Updated.
Deactivation
- In WordPress administrator main navigation click ActiveMember360, Modules.
- In ActiveMember360 Modules tabs click Automatic Webhook.
- Set Enable Automatic Webhook module to No/Off.
- Click Save Settings.
ActiveMember360 will then automatically delete the webhook from ActiveCampaign, Settings, Developer, Manage Webhooks.
If you no longer wish to use ActiveMember360 on a particular site you should also go through this deactivation process.
This will ensure that no unnecessary HTTP POSTs posted by the Automatic Webhooks are sent to your site. This will minimise the load on your server and prevent HTTP POST failures caused by ActiveMember360 no longer being active to service them.
Testing The Automatic Webhook
The primary purpose of testing the webhook is to determine that any HTTP POST sent by the webhook from ActiveCampaign is successfully received by WordPress/ActiveMember360.
The process for testing is as follows:
- Within WordPress enable the ActiveMember360 API/Webhook logging as detailed at ActiveMember360, Settings, Logging.
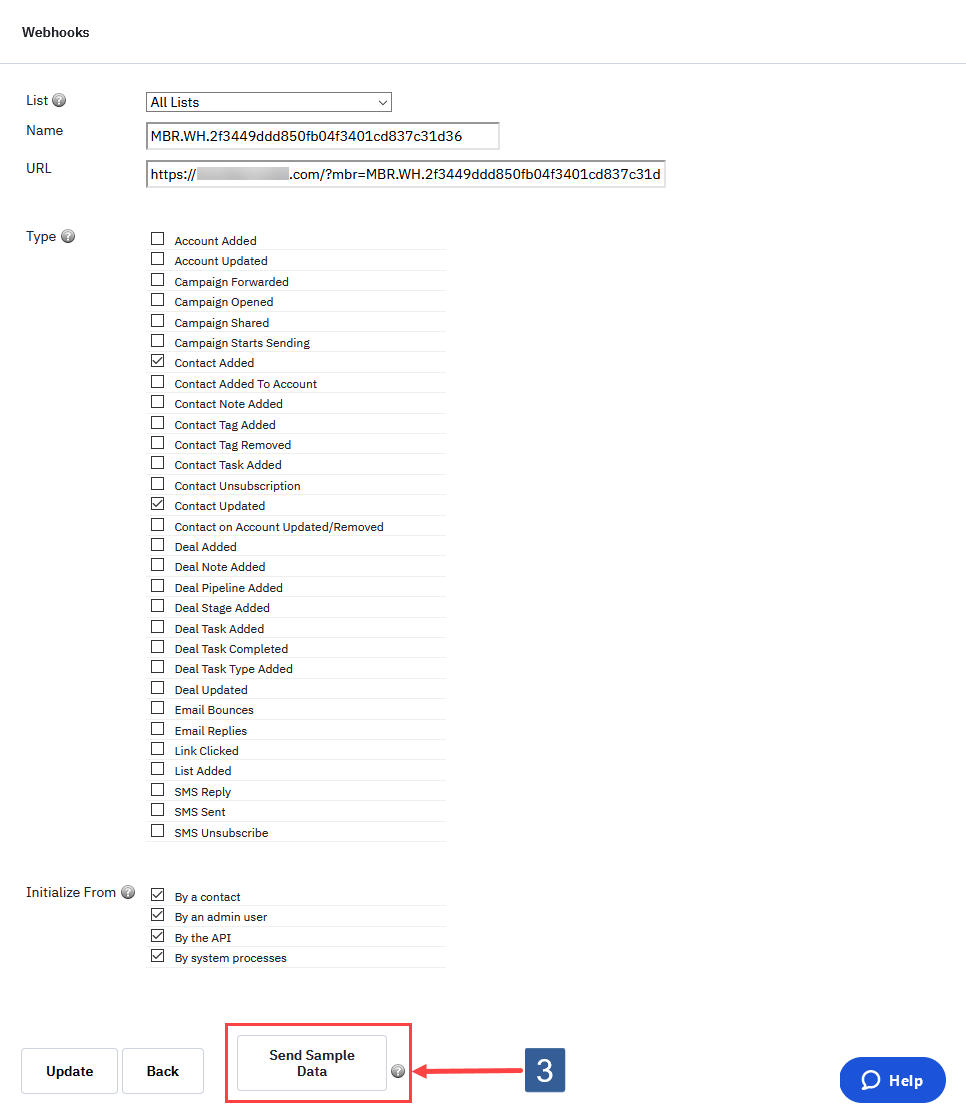
- Within ActiveCampaign Settings, Developer, Manage Webhooks select edit for the webhook that has the URL of your WordPress site.
-
Click on Send Sample Data
-
Within WordPress navigate to ActiveMember360, Utilities, API/Webhook Log.
-
Interrogate the log for a recent entry with the method
incoming_webhook [primary]orincoming_webhook. If either entry is present the HTTP POST for the webhook was received successfully by ActiveMember360 and all is working correctly.
API log listing for incoming_webhook For a fuller understanding of the log please refer to ActiveMember360, Utilities, API/Webhook Log
-
Then from within ActiveCampaign manually add a new contact and repeat Step 5 above.
It is important that you perform the outlined tests for every site running ActiveMember360 and using automatic webhooks. This is because any one of those sites could be used to automatically generate a password. The actual site used will depend upon several factors however you have no control over the one used.
You can determine those sites from the listing shown within ActiveMember360, Utilities, API/Webhook Log or alternatively within ActiveCampaign, Settings, Developer, Manage Webhooks listed as those with URLs containing MBR.
Troubleshooting The Automatic Webhook
If testing of the automatic webhook is not successful it is most likely that your server/website security is such that a plugin, service or firewall on the server is blocking the HTTP POSTs.
-
Firstly check your server logs to determine where the issue possibly lies.
You should see entries of the form shown below:

Steps to send sample webhook data from ActiveCampaign
Where the identifier:
A. Is the ActiveCampaign IP address from which it was sent. These should be on your whitelist.
B. Is the date/time sent.
C. Is an identifier string.
D. Is the name of your ActiveCampaign application.
E. Should be 200 and indicates the HTTP POST was successfully received.
If these entries are missing or a different number from 200 is shown there is an issue.
-
Set any security service/plugin or firewall to allow HTTP POSTs from the following wildcard:
i.e with any URL parameters whose first three characters are mbr followed by any other characters.
Obviously replace https://yoursite.com with your WordPress site URL as shown in WordPress, Settings, General, Site URL.
-
Set any security service/plugin or firewall to allow HTTP POSTs with blank user agents.
-
Set any security service/plugin or firewall to whitelist the ActiveCampaign IP addresses:
173.193.9.0/24
173.193.9.198
23.20.225.34
34.192.144.26
34.199.37.208
34.230.175.182
34.233.54.78
34.233.145.248
34.233.239.23
35.169.241.145
44.209.1.85
44.206.115.225
52.7.228.32
52.45.6.233
52.45.183.46
52.55.227.5
52.72.254.82
52.86.138.218
This is not a definitive list as ActiveCampaign do not publish the IPs they use. So there may well be others to whitelist but if they are being blocked they can be determined from your security service/plugin or firewall.
-
Having done the above test again. If you are still having issues please submit a support ticket for us to assist here.
Considerations When Using Automatic Webhooks
For the vast majority of ActiveMember360 users the following will not be relevant however it is best to be aware of such considerations.
The number of webhooks processed and HTTP POST requests made when using automatic webhooks within ActiveCampaign can be siginicant and will depend upon:
- The number of sites running WordPress/ActiveMember360 and connecting to the same ActiveCampaign application.
- The number of contacts within the ActiveCampaign application.
- The number of updates made to the ActiveCampaign contacts.
ActiveCampaign provides no way of limiting the number of webhooks triggered when using Contact Added and Contact Updated. They cannot be limited to only the contacts who are remote users of your sites.
Depending upon the server resources available the sheer volume of HTTP POSTs requests made in certain circumstances could result in performance/availability issues for your servers and hence websites.
So you will need to mitigate against such issues by ensuring that either/and/or:
- Your hosting plan provides an automatic scaleable way of increasing resources to meet requirements.
- Your hosting company or WAF (Web Application Firewall) understands that such HTTP POSTs to any URL containing the string MBR. or mbr_ in the URL string are not DDoS attacks and therefore do not block such requests.
- You deactivate automatic webhooks for all redundant, inactive, development and staging sites specifically when making bulk changes to contacts. See Deactivation.
- You make bulk changes to ActiveCampaign contacts in manageable numbers.
- You consider disabling automatic webhooks and switching to using automation webhooks within ActiveCampaign. These provide much more control regarding for which contacts the webhook is triggered. See: Using Automation Webhooks