Order Status Actions
There are a whole series of actions that can be performed by ActiveMember360 upon a WooCommerce order status change.
These actions are defined for individual products when creating or editing any WooCommerce product.
These actions can include:
- Add ActiveCampaign tags
- Remove ActiveCampaign tags
- Add to ActiveCampaign automations
- Remove from ActiveCampaign automations
- Subscribe to ActiveCampaign lists
- Unsubscribe from ActiveCampaign lists
- Note added to ActiveCampaign contact
Configuring Product Order Status Actions
Steps for specifying WooCommerce product order status actions
-
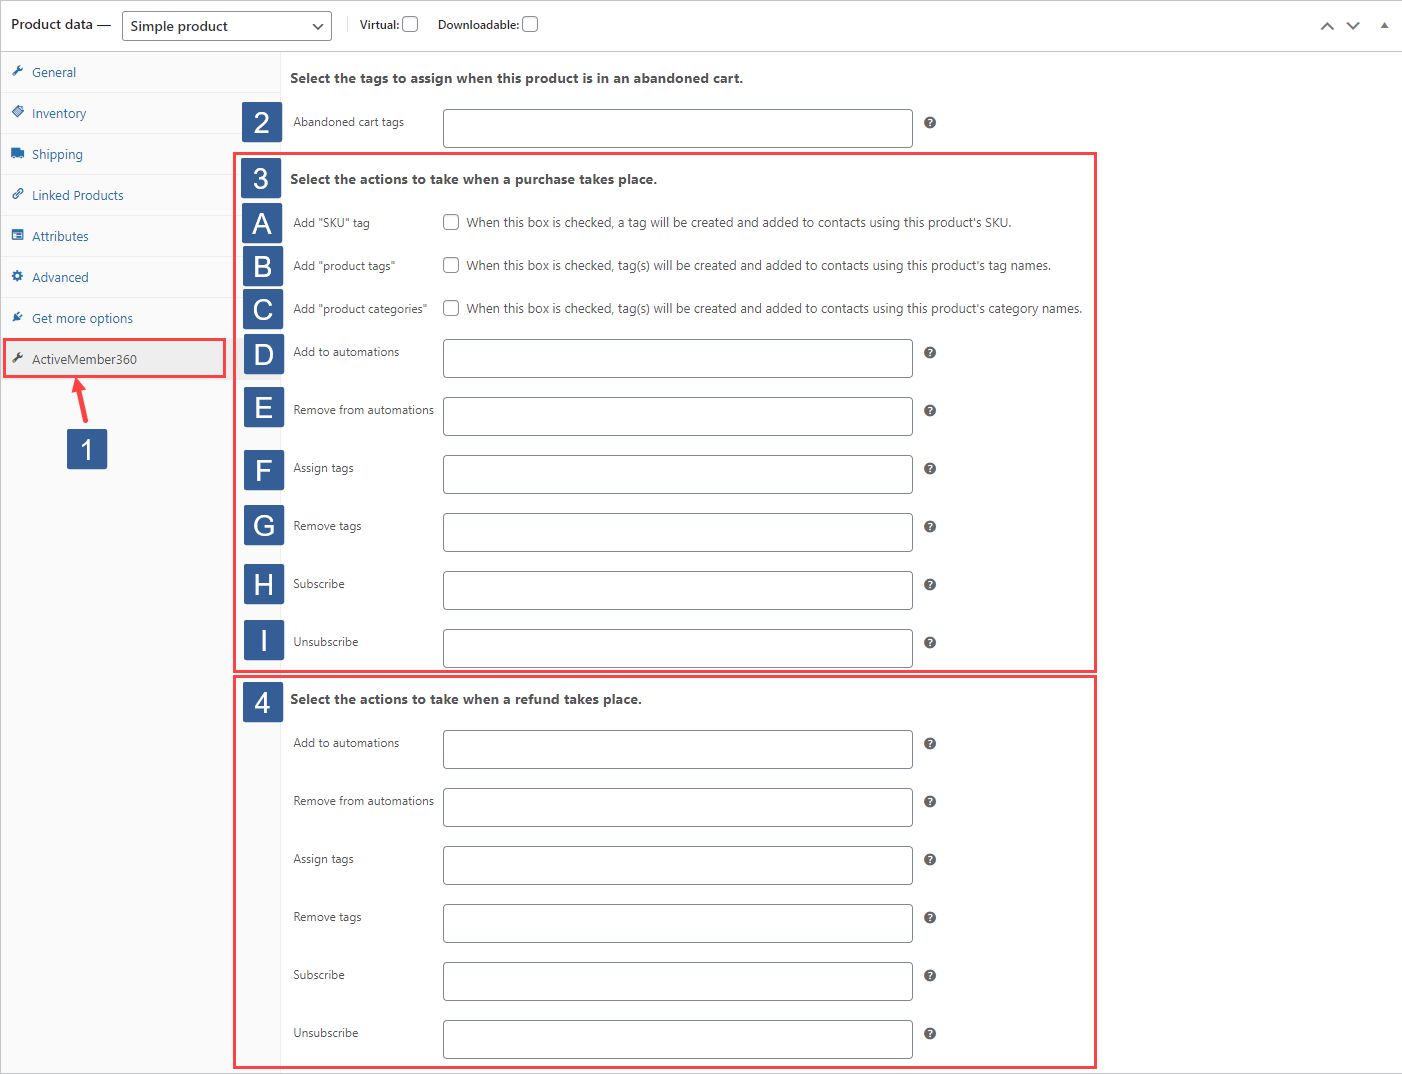
In WooCommerce Product data tabs click ActiveMember360.
-
Abandoned Cart
From the Abandoned cart tags drop down select the ActiveCampaign contact tags to be added when the product is in an abandoned cart.
Click the drop down then scroll or start typing any consecutive characters of the contact tag name to refine the list and aid selection.
Then click on the required tag.
Multiple tags can be selected as required.
Individual tags can be removed from the selection by clicking on the x shown next to the individual tag name.
Default: None
-
Purchased
Select the actions to process when a purchase has taken place. These trigger when payment for the order is complete. That is when the order status is first changed to either Processing or Completed.
A. When Add "SKU" tag is checked a tag will be automatically created if it does not already exist using this product's SKU and added to contact.
B. When Add "product tags" tag is checked tags will be automatically created if it does not already exist using this product's product tag names and added to contact.
C. When Add "product categories" tag is checked tags will be automatically created if it does not already exist using this product's category tag names and added to contact.
D. From the Add to automations drop down select the ActiveCampaign automations to which the contact will be added.
Click the drop down then scroll or start typing any consecutive characters of the automation name to refine the list and aid selection.
Then click on the required automation.
Multiple automations can be selected as required.
Individual automations can be removed from the selection by clicking on the x shown next to the individual automation name.
Default: None
E. From the Remove from automations drop down select the ActiveCampaign automations from which the contact will be removed.
Click the drop down then scroll or start typing any consecutive characters of the automation name to refine the list and aid selection.
Then click on the required automation.
Multiple automations can be selected as required.
Individual automations can be removed from the selection by clicking on the x shown next to the individual automation name.
Default: None
F. From the Add tags drop down select the ActiveCampaign contact tags to be added.
Click the drop down then scroll or start typing any consecutive characters of the contact tag name to refine the list and aid selection.
Then click on the required tag.
Multiple tags can be selected as required.
Individual tags can be removed from the selection by clicking on the x shown next to the individual tag name.
Default: None
G. From the Remove tags drop down select the ActiveCampaign contact tags to be removed.
Click the drop down then scroll or start typing any consecutive characters of the contact tag name to refine the list and aid selection.
Then click on the required tag.
Multiple tags can be selected as required.
Individual tags can be removed from the selection by clicking on the x shown next to the individual tag name.
Default: None
H. From the Subscribe drop down select the ActiveCampaign lists to which the contact will be subscribed.
Click the drop down then scroll or start typing any consecutive characters of the list name to refine the list and aid selection.
Then click on the required list.
Multiple lists can be selected as required.
Individual lists can be removed from the selection by clicking on the x shown next to the individual list name.
Default: None
I. From the Unsubscribe drop down select the ActiveCampaign lists from which the contact will be unsubscribed.
Click the drop down then scroll or start typing any consecutive characters of the list name to refine the list and aid selection.
Then click on the required list.
Multiple lists can be selected as required.
Individual lists can be removed from the selection by clicking on the x shown next to the individual list name.
Default: None
-
Refunded
Select the actions to process when a refund takes place: These trigger when the order is set to the WooCommerce status of Refunded.
Repeat steps as described in step 3 D to I above.
For a full explanation of WooCommerce order statuses see: WooCommerce Order Statuses.
Configuring Subscription Order Status Actions
Steps for specifying WooCommerce subscription order status actions
-
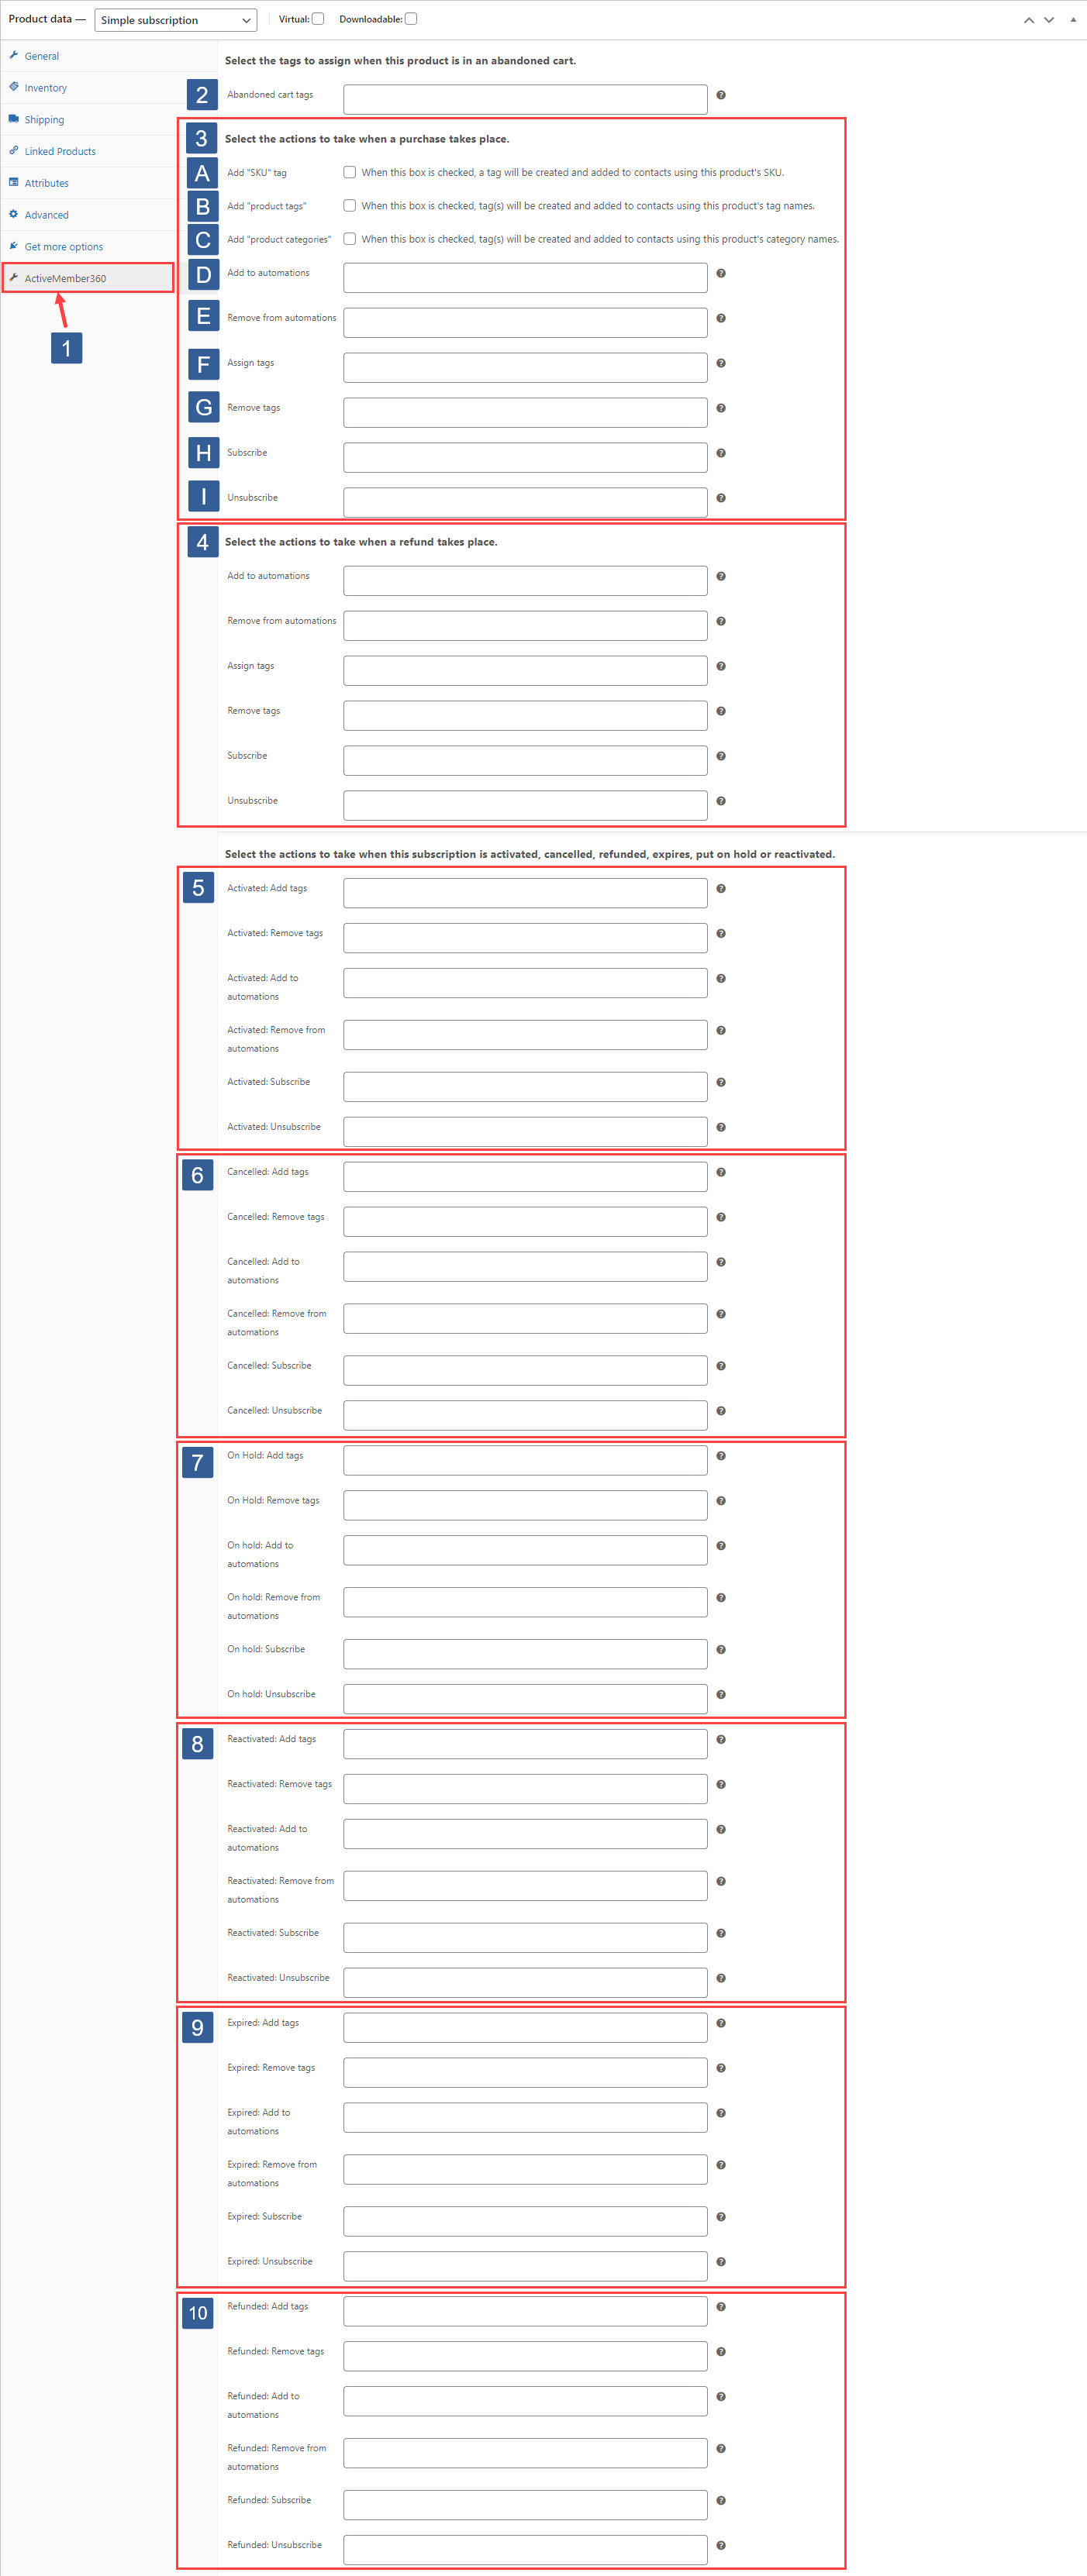
In WooCommerce Product data tabs click ActiveMember360.
-
Abandoned Cart
From the Abandoned cart tags drop down select the ActiveCampaign contact tags to be added when the product is in an abandoned cart.
Click the drop down then scroll or start typing any consecutive characters of the contact tag name to refine the list and aid selection.
Then click on the required tag.
Multiple tags can be selected as required.
Individual tags can be removed from the selection by clicking on the x shown next to the individual tag name.
Default: None
Actions can be applied when the following statuses are set:
-
Purchased
Select the actions to process when a purchase has taken place. These trigger when payment for the order is complete. That is when the order status is first changed to either Processing or Completed.
A. When Add "SKU" tag is checked a tag will be automatically created if it does not already exist using this product's SKU and added to contact.
B. When Add "product tags" tag is checked tags will be automatically created if it does not already exist using this product's product tag names and added to contact.
C. When Add "product categories" tag is checked tags will be automatically created if it does not already exist using this product's category tag names and added to contact.
D. From the Add to automations drop down select the ActiveCampaign automations to which the contact will be added.
Click the drop down then scroll or start typing any consecutive characters of the automation name to refine the list and aid selection.
Then click on the required automation.
Multiple automations can be selected as required.
Individual automations can be removed from the selection by clicking on the x shown next to the individual automation name.
Default: None
E. From the Remove from automations drop down select the ActiveCampaign automations from which the contact will be removed.
Click the drop down then scroll or start typing any consecutive characters of the automation name to refine the list and aid selection.
Then click on the required automation.
Multiple automations can be selected as required.
Individual automations can be removed from the selection by clicking on the x shown next to the individual automation name.
Default: None
F. From the Add tags drop down select the ActiveCampaign contact tags to be added.
Click the drop down then scroll or start typing any consecutive characters of the contact tag name to refine the list and aid selection.
Then click on the required tag.
Multiple tags can be selected as required.
Individual tags can be removed from the selection by clicking on the x shown next to the individual tag name.
Default: None
G. From the Remove tags drop down select the ActiveCampaign contact tags to be removed.
Click the drop down then scroll or start typing any consecutive characters of the contact tag name to refine the list and aid selection.
Then click on the required tag.
Multiple tags can be selected as required.
Individual tags can be removed from the selection by clicking on the x shown next to the individual tag name.
Default: None
H. From the Subscribe drop down select the ActiveCampaign lists to which the contact will be subscribed.
Click the drop down then scroll or start typing any consecutive characters of the list name to refine the list and aid selection.
Then click on the required list.
Multiple lists can be selected as required.
Individual lists can be removed from the selection by clicking on the x shown next to the individual list name.
Default: None
I. From the Unsubscribe drop down select the ActiveCampaign lists from which the contact will be unsubscribed.
Click the drop down then scroll or start typing any consecutive characters of the list name to refine the list and aid selection.
Then click on the required list.
Multiple lists can be selected as required.
Individual lists can be removed from the selection by clicking on the x shown next to the individual list name.
Default: None
-
Refunded
Select the actions to process when a refund takes place: These trigger when the order is set to the WooCommerce status of Refunded.
Repeat steps as described in step 3 D to I above.
-
Activated
Activated: After the initial payment for a subscription has been processed (if any payment is required) and the status of the order is Completed the subscription will be transitioned to the Active status. The settings here apply when the subscription is set to Active and the previous status WAS NOT On Hold.
Repeat steps as described in step 3 D to I above.
-
Cancelled
Cancelled: The settings here apply when a subscription is Cancelled. These settings do not apply when the subscription is marked for cancellation only upon the actual cancellation i.e. at the end of the paid up period.
Repeat steps as described in step 3 D to I above.
-
On Hold
On Hold: When an associated order is awaiting payment, or it has been manually suspended by the store owner or customer the subscription has an On Hold status. If it was manually suspended, it will need to be manually reactivated. If it was suspended awaiting payment, it will be reactivated once that payment is processed.
Repeat steps as described in step 3 D to I above.
-
Reactivated
Reactivated: The settings here apply when a subscription is set to Active after it WAS On Hold.
Repeat steps as described in step 3 D to I above.
-
Expired
Expired: The settings here apply when a subscription status is Expired.
Repeat steps as described in step 3 D to I above.
-
Refunded
Refunded: The settings here apply to when a subscription is Refunded.
Repeat steps as described in step 3 D to I above.
When setting actions it is important to note that when a subscription renews the status is automatically first set to On Hold and then when a successful payment has been made it is set to purchase Completed and subscription Active.
So the subscription renewal triggers the actions; Subscription On Hold, Subscription Purchased, Subscription Reactivated in that order.
For a full explanation of WooCommerce Subscription statuses see: WooCommerce Subscription Statuses.
Configuring Additional Purchased Order Status Actions for Variable Product/Subscription Variations
The process of configuring additional purchased order status actions is the same for both variable product variations and variable subscription variations.
These order status actions are triggered when payment for the order is complete. That is when the order status is first changed to either Processing or Completed.
Steps for specifying WooCommerce variable product order status actions
-
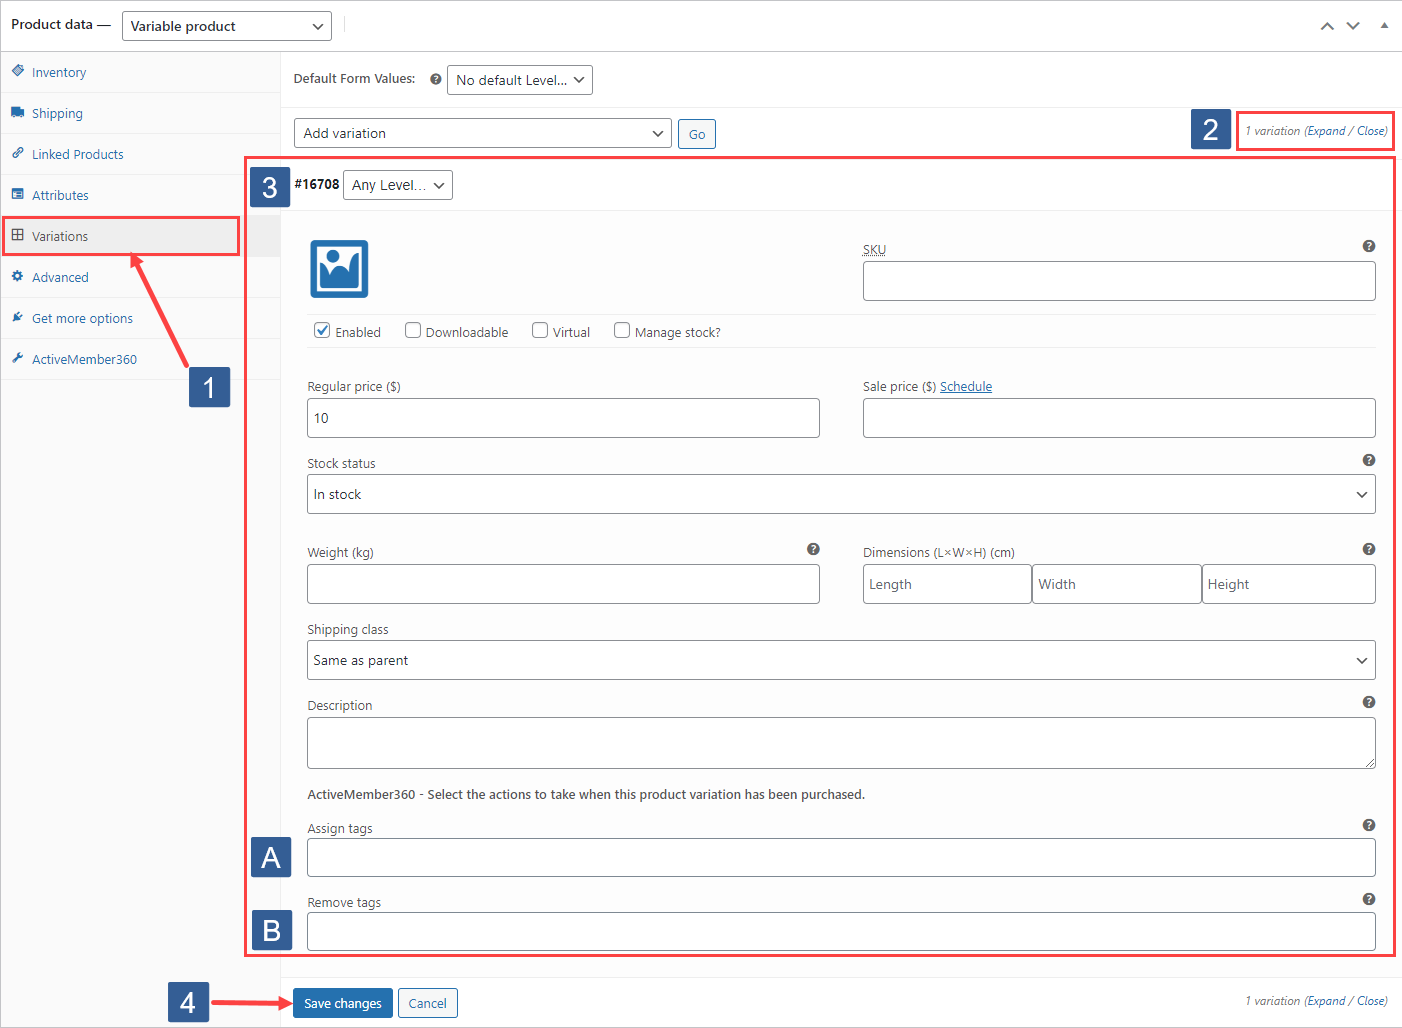
In WooCommerce Product data tabs click Variations.
-
Click Expand/Close to show the settings of all variations
-
Purchased
Select the actions to process when a purchase has taken place. These trigger when payment for the order is complete. That is when the order status is first changed to either Processing or Completed.
A. From the Add tags drop down select the ActiveCampaign contact tags to be added.
Click the drop down then scroll or start typing any consecutive characters of the contact tag name to refine the list and aid selection.
Then click on the required tag.
Multiple tags can be selected as required.
Individual tags can be removed from the selection by clicking on the x shown next to the individual tag name.
Default: None
B. From the Remove tags drop down select the ActiveCampaign contact tags to be removed.
Click the drop down then scroll or start typing any consecutive characters of the contact tag name to refine the list and aid selection.
Then click on the required tag.
Multiple tags can be selected as required.
Individual tags can be removed from the selection by clicking on the x shown next to the individual tag name.
Default: None
Repeat steps A to B above for each variation as required.
-
Click Save Changes.