Contact Form 7 Extension

Overview
The ActiveMember360 Contact Form 7 Extension provides a deep integration with Contact Form 7 customisable for each form defined.
- Automatically populates ActiveCampaign fields defined within the form for a remote user
- Automatically creates or updates the ActiveCampaign contact after the Contact Form 7 form is successfully submitted
- Automatically updates an ActiveCampaign contact with actions after the successful Contact Form 7 form submission including:
- Add ActiveCampaign tags
- Remove ActiveCampaign tags
- Add to ActiveCampaign automations
- Remove from ActiveCampaign automations
- Subscribe to ActiveCampaign lists
- Unsubscribe from ActiveCampaign lists
- Redirects to any chosen page/post after the successful Contact Form 7 form submission
- Provides an autologin option for a contact after the successful Contact Form 7 form submission
- Supports ActiveCampaign Event Tracking for successful Contact Form 7 form submissions
Activation
The Contact Form 7 plugin must have previously been installed and activated on your site in order to be able to activate the ActiveMember360 Contact Form 7 extension.
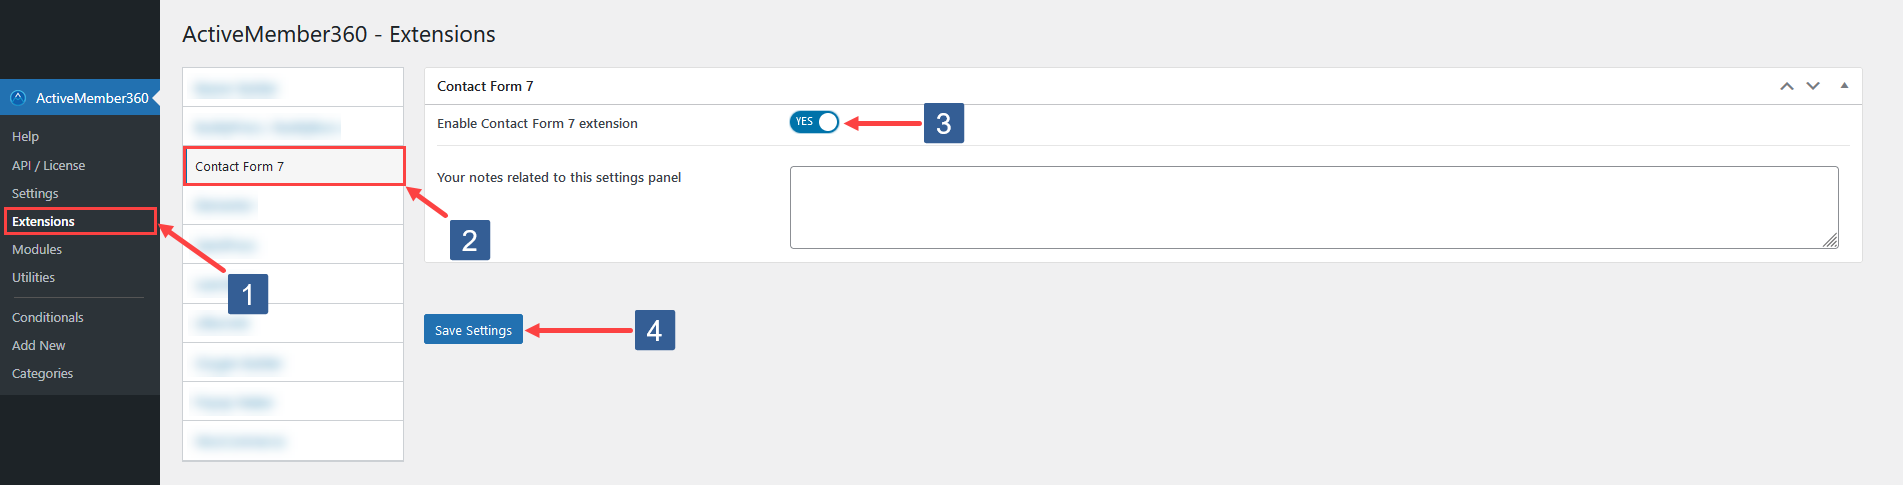
- In WordPress administrator main navigation click ActiveMember360, Extensions.
- In ActiveMember360 Extensions tabs click Contact Form 7.
- Set Enable Contact Form 7 Extension to Yes.
- Click Save Settings.
Form Settings
Every individual form can be selectively configured to integrate with ActiveCampaign using the ActiveMember360 Contact From 7 Extension.
Steps for specifying ActiveMember360 form integration settings
-
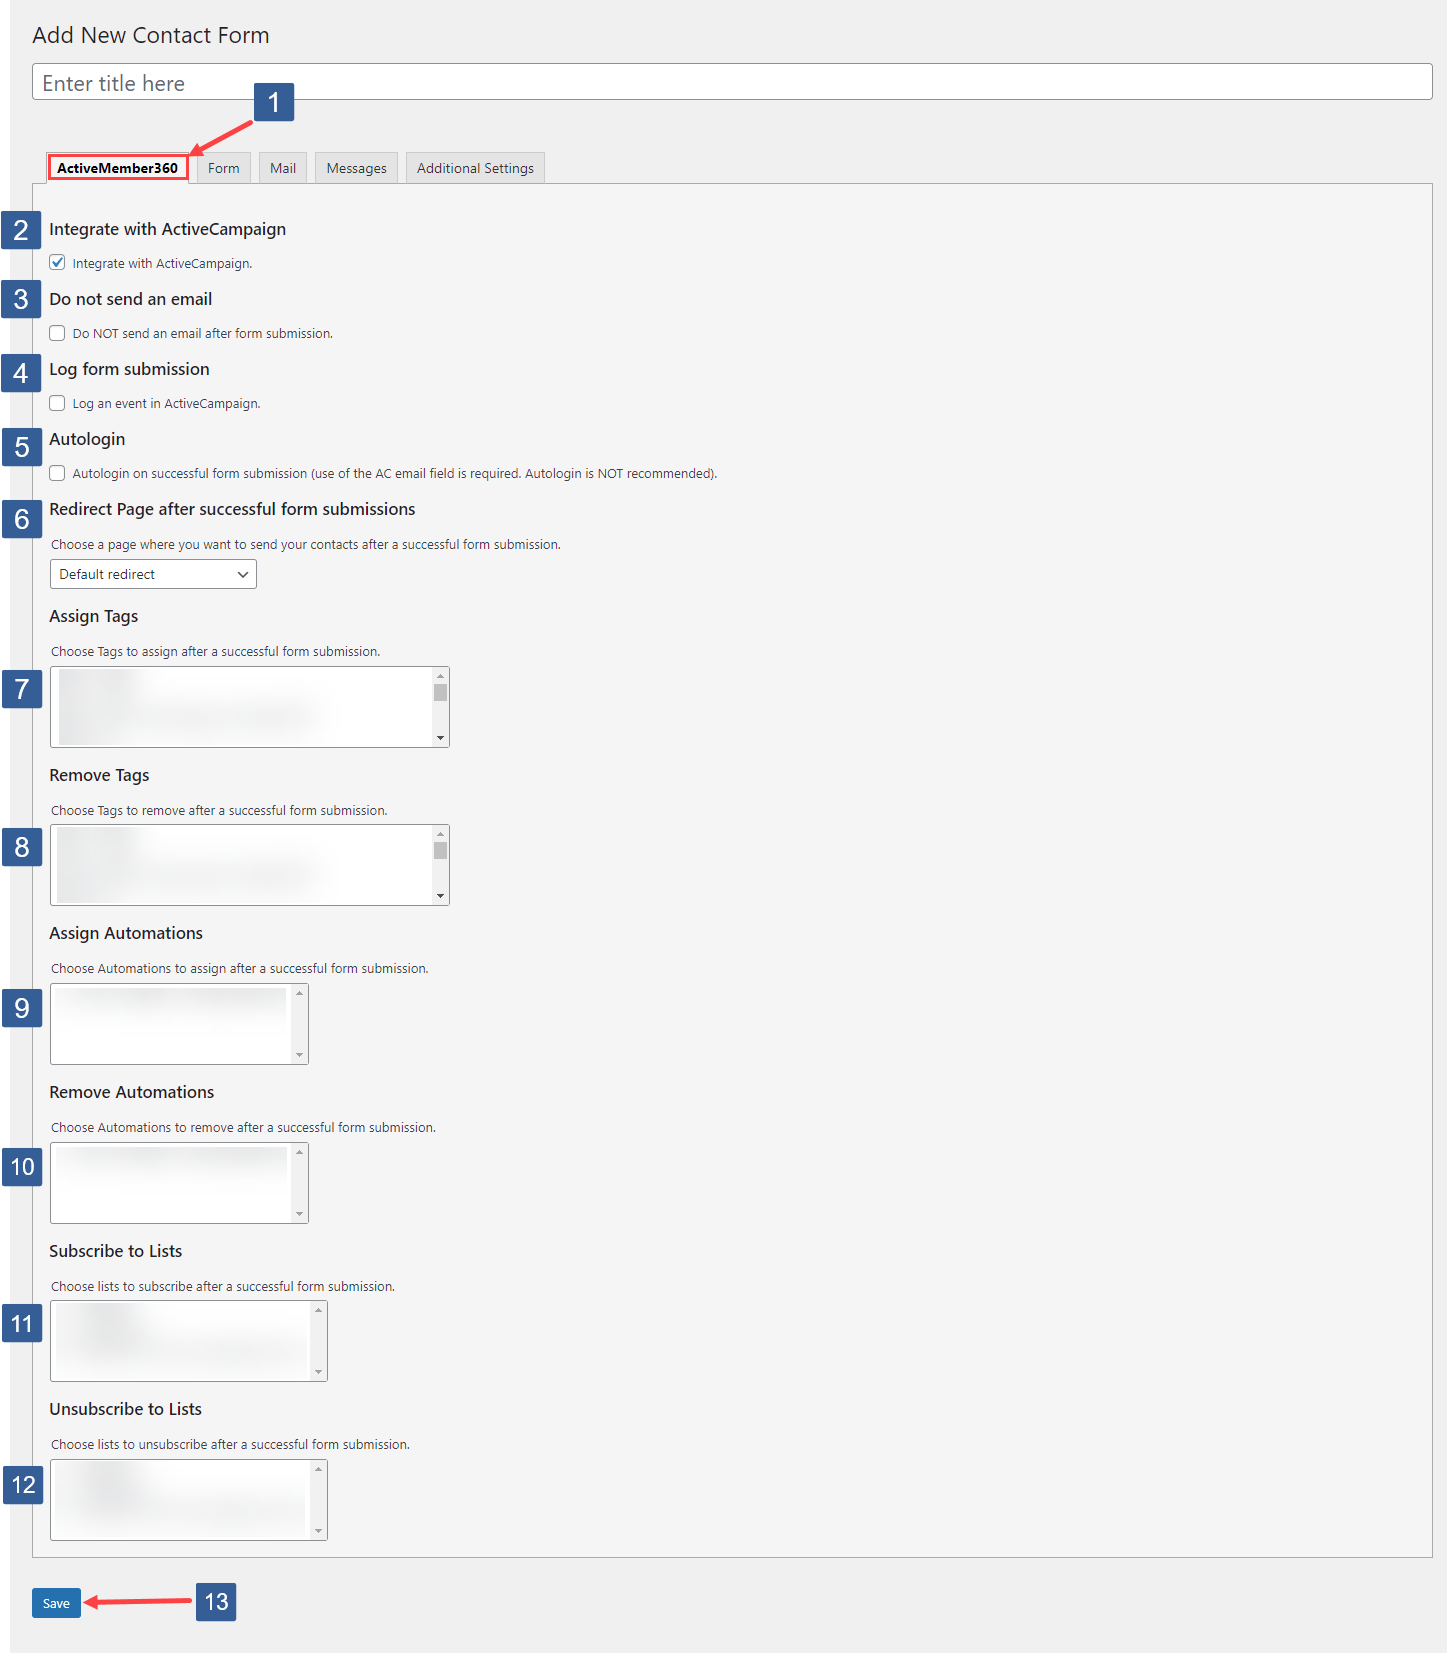
Select the ActiveMember360 tab.
-
Check Integrate with ActiveCampaign to Yes if you wish the form to integrate with ActiveCampaign.
ImportantThis will enable the other ActiveMember360 settings for the form as detailed below and within Form Fields.
When a remote user is shown the form any ActiveCampaign fields defined within the form will be automatically populated from the ActiveCampaign contact record.
When a form is successfully submitted containing the ActiveCampaign field named
email, if a contact with the submitted email address exists within ActiveCampaign that contact will be updated, otherwise they will be created as a contact with that email address. -
Check Do not send an email as required.
When checked the emails defined within the Contact Form 7 form Mail tab will not be sent after a form submission.
-
Check Log form submission as required.
When checked a form submission event will be logged within ActiveCampaign. The name of the event will match the name of the Contact Form 7 form.
In order to track the Contact Form 7 form submission events you must also have the enabled and configured the ActiveMember360 ActiveCampaign Tracking Module.
The tracked event can be used to trigger an automation within ActiveCampaign as detailed within Using Event Tracking to trigger automations.
-
Check Autologin as required.
The Autologin option allows validated ActiveCampaign contacts to autologin to the WordPress ActiveMember360 site after successful submission of the form.
In order to use the autologin feature the form must have an ActiveCampaign field named
emailspecified.Also the ActiveMember360 Autologin module must be activated as detailed within Activate the Autologin module and a security code defined within ActiveMember360, Settings, Security, Security Codes.
The code used for the autologin will be the first in the list of defined codes.
ImportantBe aware that the autologin URL used as a thank you page URL for a form is not secure. As with any login credentials if the autologin link is shared someone could login as you.
For that reason autologin is not recommended and if used should be done so with due diligence.
-
From the Redirect page after successful form submission drop down select a page/post where you want to send your contacts after a successful form submission.
The page/post selected will be used in all situations including for a visitor, logged in user and where autologin is used see step 5 above.
-
From the Add tags select box select the ActiveCampaign contact tags to be added after a successful form submission.
Scroll or start typing any consecutive characters of the contact tag name to refine the list and aid selection.
Then click on the required tag.
Multiple tags can be selected as required using standard operating system controls i.e. for Windows the ctrl key.
Individual tags can be removed from the selection by clicking a different tag or when using multiple select by clicking them again.
Default: None
-
From the Remove tags select box select the ActiveCampaign contact tags to be removed after a successful form submission.
Scroll or start typing any consecutive characters of the contact tag name to refine the list and aid selection.
Then click on the required tag.
Multiple tags can be selected as required using standard operating system controls i.e. for Windows the ctrl key.
Individual tags can be removed from the selection by clicking a different tag or when using multiple select by clicking them again.
Default: None
-
From the Add to automations select box select the ActiveCampaign automations to which the contact will be added after a successful form submission.
Scroll or start typing any consecutive characters of the automation name to refine the list and aid selection.
Then click on the required automation.
Multiple automations can be selected as required using standard operating system controls i.e. for Windows the ctrl key.
Individual automations can be removed from the selection by clicking a different automation or when using multiple select by clicking them again.
Default: None
-
From the Remove from automations select box select the ActiveCampaign automations from which the contact will be removed after a successful form submission.
Scroll or start typing any consecutive characters of the automation name to refine the list and aid selection.
Then click on the required automation.
Multiple automations can be selected as required using standard operating system controls i.e. for Windows the ctrl key.
Individual automations can be removed from the selection by clicking a different automation or when using multiple select by clicking them again.
Default: None
-
From the Subscribe select box select the ActiveCampaign lists to which the contact will be subscribed after a successful form submission.
Scroll or start typing any consecutive characters of the list name to refine the list and aid selection.
Then click on the required list.
Multiple lists can be selected as required using standard operating system controls i.e. for Windows the ctrl key.
Individual lists can be removed from the selection by clicking a different list or when using multiple select by clicking them again.
Default: None
-
From the Unsubscribe select box select the ActiveCampaign lists from which the contact will be unsubscribed after a successful form submission.
Scroll or start typing any consecutive characters of the list name to refine the list and aid selection.
Then click on the required list.
Multiple lists can be selected as required using standard operating system controls i.e. for Windows the ctrl key.
Individual lists can be removed from the selection by clicking a different list or when using multiple select by clicking them again.
Default: None
-
Click Save to save your settings.
Form Fields
To define the form fields that will populate ActiveCampaign follow the steps below:
-
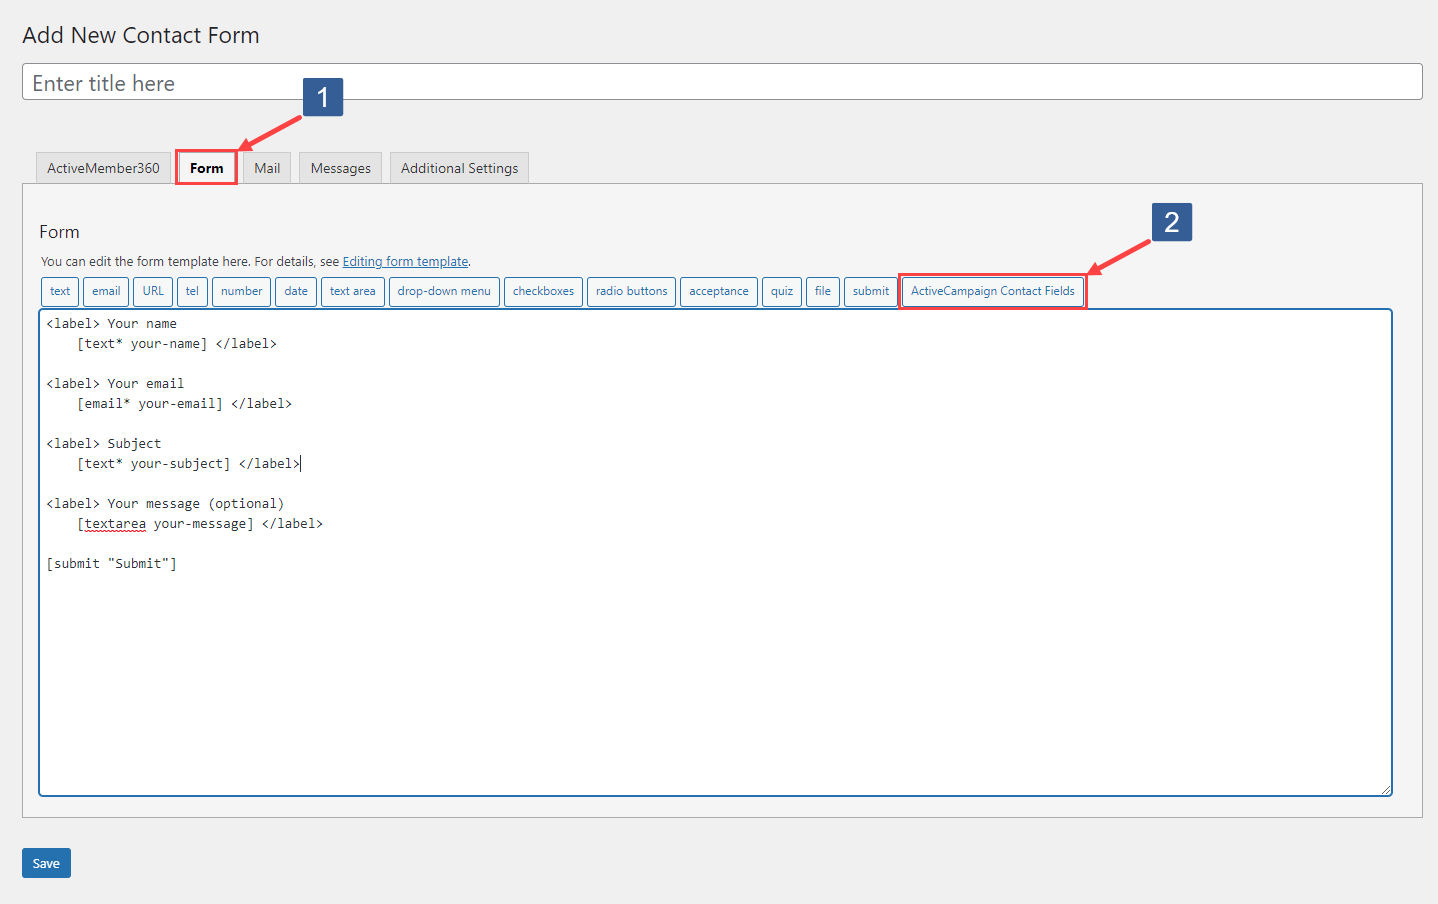
When creating or editing a Contact Form 7 form select the Form tab.
-
Select ActiveCampaign Contact Fields form tag.
The form tag generator for ActiveCampaign contact fields will then display.
Steps for specifying form fields using ActiveCampaign contact fields
-
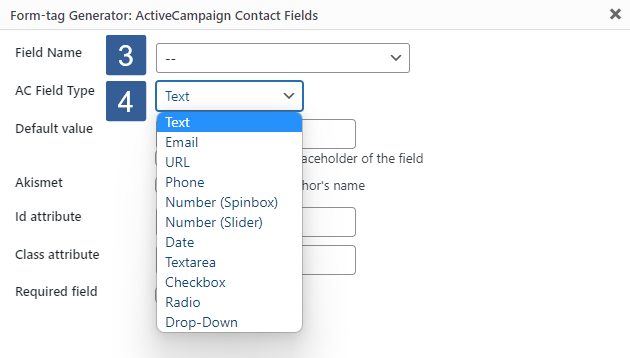
From the Field Name drop down select the ActiveCampaign field.
The fields shown for selection are those already defined within your ActiveCampaign application.
ImportantThe ActiveCampaign field named
emailis the unique identifier for the contact.For any form to be integrated with ActiveCampaign it must have an ActiveCampaign field named
emailselected.When a form is successfully submitted containing the ActiveCampaign field named
email, if a contact with the submitted email address exists within ActiveCampaign that contact will be updated, otherwise they will be created as a contact with that email address. -
From the AC Field Type drop down select the field type.
This is used to determine the other options for this field type and the field validation.
- Text - This is the equivalent of the ActiveCampaign Text Input field type.
- Email - This is the equivalent of the ActiveCampaign Text Input field type.
- URL - This is the equivalent of the ActiveCampaign Text Input field type.
- Phone - This is the equivalent of the ActiveCampaign Text Input field type.
- Number - This is the equivalent of the ActiveCampaign Text Input field type.
- Number - This is the equivalent of the ActiveCampaign Text Input field type.
- Date - This is the equivalent of the ActiveCampaign Date field type.
- Text Area - This is the equivalent of the ActiveCampaign Text Area field type.
- Checkbox - This is the equivalent of the ActiveCampaign Checkbox field type.
- Radio - This is the equivalent of the ActiveCampaign Radio Button field type.
- Drop Down - This is the equivalent of the ActiveCampaign List Box and Dropdown field type.
- Text
- URL
- Phone
- Number Spinner
- Number Slider
- Date
- Text Area
- Checkbox
- Radio
- Drop Down
-
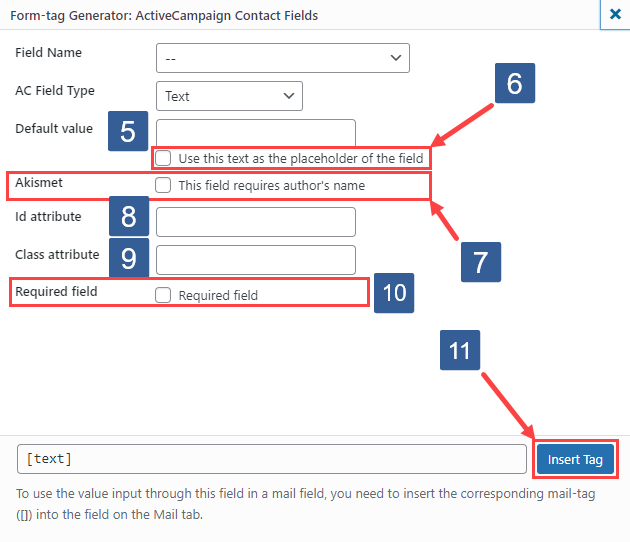
Specify any required Default Value for the field within the form.
-
Check Use this text as the placeholder of the field as required.
When checked the Default Value will be used as placeholder text rather than the default value for the field.
-
Check Akismet as required.
This will set the Contact Form 7 akismet variable to author-name.
The WordPress Akismet plugin must be activated for this setting to have effect.
-
Specify the CSS Id attribute required for the
<input>HTML tag for the chosen field. -
Specify the CSS Class attribute required for the
<input>HTML tag for the chosen field. -
Check Required field as required.
When checked the form validation will ensure a value is entered for the field before the form submission is fully processed.
-
When Insert Tag is clicked the form code will be inserted at the current cursor location in the form.
-
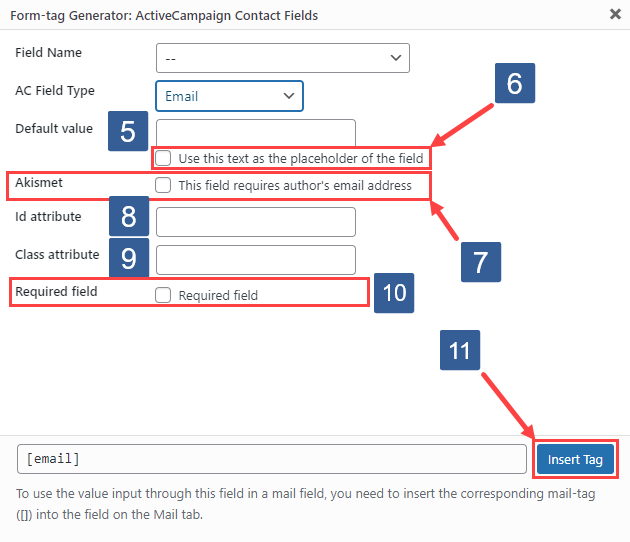
Specify any required Default Value for the field within the form.
-
Check Use this text as the placeholder of the field as required.
When checked the Default Value will be used as placeholder text rather than the default value for the field.
-
Check Akisimet as required.
This will set the Contact Form 7 akismet variable to author-email.
The WordPress Akismet plugin must be activated for this setting to have effect.
-
Specify the CSS Id attribute required for the
<input>HTML tag for the chosen field. -
Specify the CSS Class attribute required for the
<input>HTML tag for the chosen field. -
Check Required field as required.
When checked the form validation will ensure a value is entered for the field before the form submission is fully processed.
-
When Insert Tag is clicked the form code will be inserted at the current cursor location in the form.
-
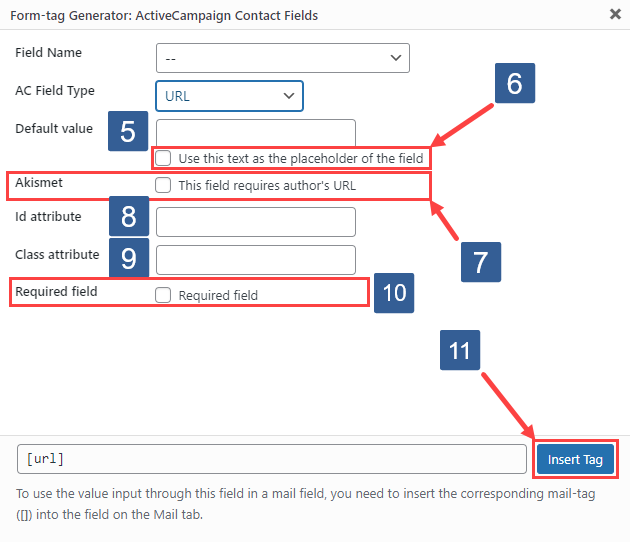
Specify any required Default Value for the field within the form.
-
Check Use this text as the placeholder of the field as required.
When checked the Default Value will be used as placeholder text rather than the default value for the field.
-
Check Akisimet as required.
This will set the Contact Form 7 akismet variable to author-url.
The WordPress Akismet plugin must be activated for this setting to have effect.
-
Specify the CSS Id attribute required for the
<input>HTML tag for the chosen field. -
Specify the CSS Class attribute required for the
<input>HTML tag for the chosen field. -
Check Required field as required.
When checked the form validation will ensure a value is entered for the field before the form submission is fully processed.
-
When Insert Tag is clicked the form code will be inserted at the current cursor location in the form.
-
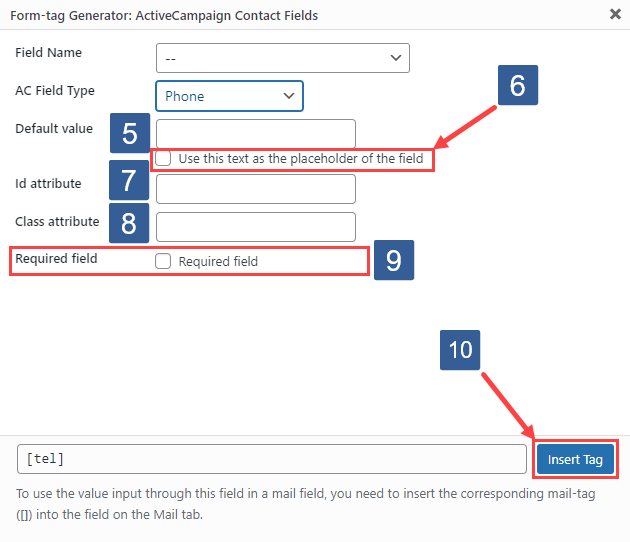
Specify any required Default Value for the field within the form.
-
Check Use this text as the placeholder of the field as required.
When checked the Default Value will be used as placeholder text rather than the default value for the field.
-
Specify the CSS Id attribute required for the
<input>HTML tag for the chosen field. -
Specify the CSS Class attribute required for the
<input>HTML tag for the chosen field. -
Check Required field as required.
When checked the form validation will ensure a value is entered for the field before the form submission is fully processed.
-
When Insert Tag is clicked the form code will be inserted at the current cursor location in the form.
-
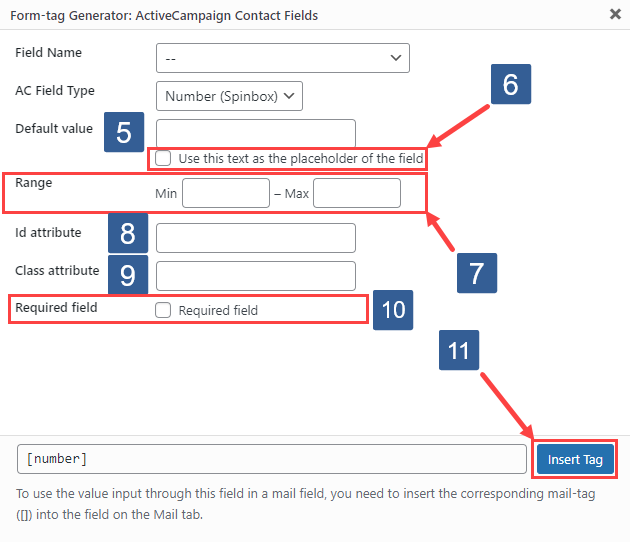
Specify any required Default Value for the field within the form.
-
Check Use this text as the placeholder of the field as required.
When checked the Default Value will be used as placeholder text rather than the default value for the field.
-
Specify within the Range inputs the Minimum and Maximum number values permitted.
-
Specify the CSS Id attribute required for the
<input>HTML tag for the chosen field. -
Specify the CSS Class attribute required for the
<input>HTML tag for the chosen field. -
Check Required field as required.
When checked the form validation will ensure a value is entered for the field before the form submission is fully processed.
-
When Insert Tag is clicked the form code will be inserted at the current cursor location in the form.

-
Specify any required Default Value for the field within the form.
-
Check Use this text as the placeholder of the field as required.
When checked the Default Value will be used as placeholder text rather than the default value for the field.
-
Specify within the Range inputs the Minimum and Maximum number values permitted.
-
Specify the CSS Id attribute required for the
<input>HTML tag for the chosen field. -
Specify the CSS Class attribute required for the
<input>HTML tag for the chosen field. -
Check Required field as required.
When checked the form validation will ensure a value is entered for the field before the form submission is fully processed.
-
When Insert Tag is clicked the form code will be inserted at the current cursor location in the form.
-
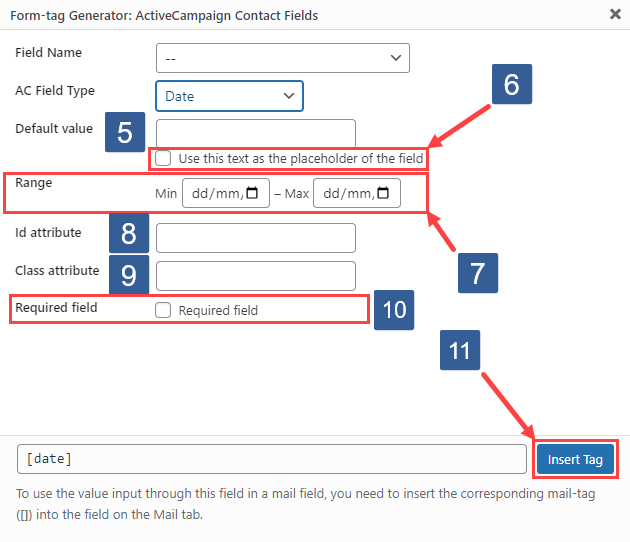
Specify any required Default Value for the field within the form.
-
Check Use this text as the placeholder of the field as required.
When checked the Default Value will be used as placeholder text rather than the default value for the field.
-
Specify within the Range inputs the Minimum and Maximum date values permitted.
Date pickers will be shown for the user to select the required values.
-
Specify the CSS Id attribute required for the
<input>HTML tag for the chosen field. -
Specify the CSS Class attribute required for the
<input>HTML tag for the chosen field. -
Check Required field as required.
When checked the form validation will ensure a value is entered for the field before the form submission is fully processed.
-
When Insert Tag is clicked the form code will be inserted at the current cursor location in the form.

-
Specify any required Default Value for the field within the form.
-
Check Use this text as the placeholder of the field as required.
When checked the Default Value will be used as placeholder text rather than the default value for the field.
-
Specify the CSS Id attribute required for the
<input>HTML tag for the chosen field. -
Specify the CSS Class attribute required for the
<input>HTML tag for the chosen field. -
Check Required field as required.
When checked the form validation will ensure a value is entered for the field before the form submission is fully processed.
-
When Insert Tag is clicked the form code will be inserted at the current cursor location in the form.
-
Check Required field as required.
When checked the form validation will ensure a value is entered for the field before the form submission is fully processed.
- When Insert Tag is clicked the form code will be inserted at the current cursor location in the form.
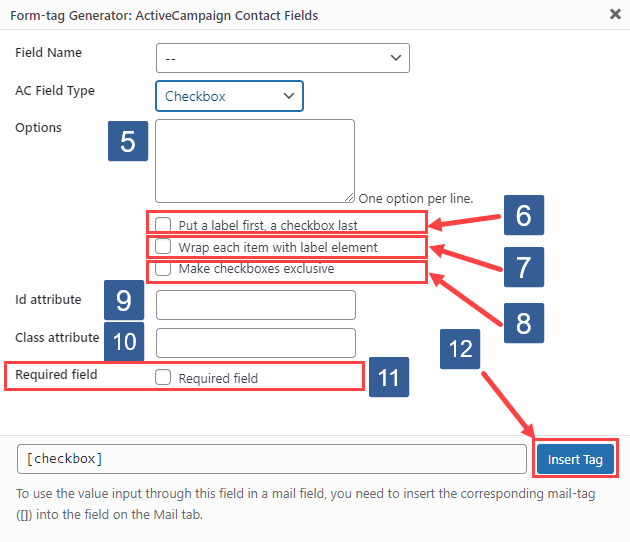
-
List the various options for the checkboxes.
Specify each option on a separate line.
These options should be set to mirror the field option settings for the ActiveCampaign contact field selected in step 2 and specified within ActiveCampaign.
-
Check Put a label first, a checkbox last as required.
-
Check Wrap each item with label element as required.
When checked the form validation will ensure a value is entered for the field before the form submission is fully processed.
-
Check Make checkboxes exclusive as required.
When not checked this is equivalent to the the ActiveCampaign Checkbox field type.
-
Specify the CSS Id attribute required for the
<input>HTML tag for the chosen field. -
Specify the CSS Class attribute required for the
<input>HTML tag for the chosen field. -
Check Required field as required.
When checked the form validation will ensure a value is entered for the field before the form submission is fully processed.
- When Insert Tag is clicked the form code will be inserted at the current cursor location in the form.
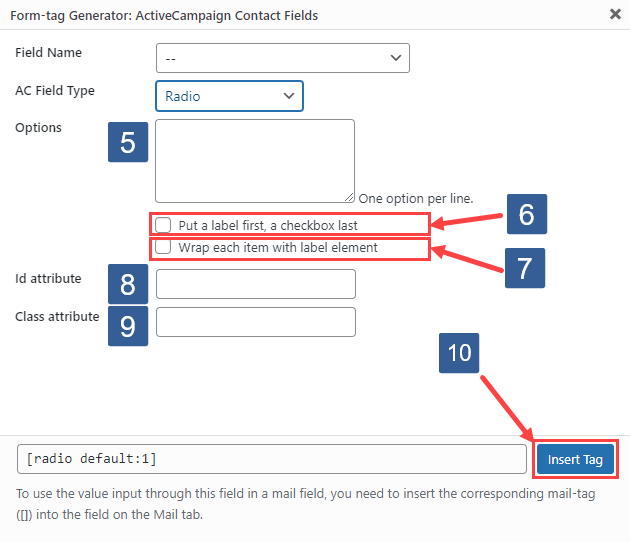
-
List the various options for the radio buttons.
Specify each option on a separate line.
These options should be set to mirror the field option settings for the ActiveCampaign contact field selected in step 2 and specified within ActiveCampaign.
-
Check Put a label first, a radio button last as required.
-
Check Wrap each item with label element as required.
-
Specify the CSS Id attribute required for the
<input>HTML tag for the chosen field. -
Specify the CSS Class attribute required for the
<input>HTML tag for the chosen field. -
When Insert Tag is clicked the form code will be inserted at the current cursor location in the form.
-
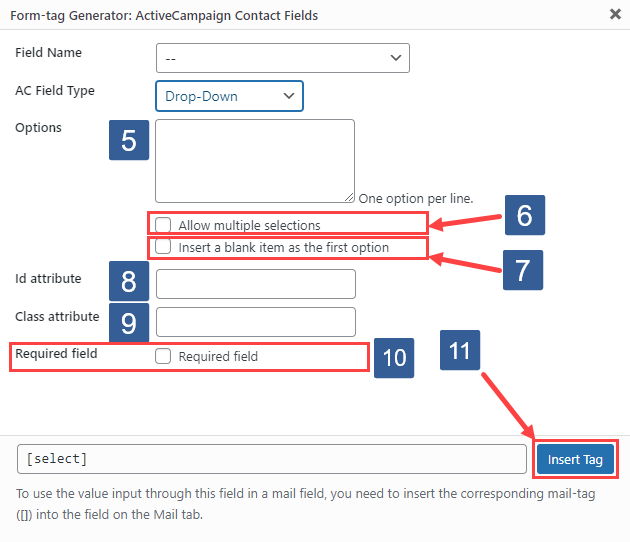
List the various options for the checkboxes.
Specify each option on a separate line.
These options should be set to mirror the field option settings for the ActiveCampaign contact field selected in step 2 and specified within ActiveCampaign.
-
Check Allow mutiple selections as required.
When checked this is equivalent to the the ActiveCampaign List Box field type.
When not checked this is equivalent to the the ActiveCampaign Dropdown field type.
-
Check Insert a blank item as the first option as required.
-
Specify the CSS Id attribute required for the
<input>HTML tag for the chosen field. -
Specify the CSS Class attribute required for the
<input>HTML tag for the chosen field. -
Check Required field as required.
When checked the form validation will ensure a value is entered for the field before the form submission is fully processed.
-
When Insert Tag is clicked the form code will be inserted at the current cursor location in the form.
Please note that when defining the Contact Form 7 form fields the ActiveCampaign contact field definition stored within ActiveCampaign is not updated i.e. the field type is not changed nor options for list, dropdown, radio and checkboxes updated.